Advertisement

Win32 - How to merge a pattern brush with a bitmap?

Started by April 13, 2020 03:23 AM
2 comments, last by Airbatz 4 years, 7 months ago

I want to use brushes for a drawing effect, but I must be doing something wrong or missing some important part. I've created some custom brush patterns which need to be "merged" with a bitmap, so when I blit it to the screen, the pattern is not a seperate overlay but an actual part of the bitmap so if there is any other image underneath, it will be visible . I don't know if I'm making sense, so below is a visual example :P

I've tried some approaches using raster ops but the result always affects the whole window. This is being done in pure GDI. Here is how I set up and use my custom brush:

// at the top of the program

HBITMAP hBrush1 = NULL;
WORD bits1[8] = { 0x1f, 0xf, 0x4f, 0xf, 0xff, 0xff, 0xff, 0xff }; //heaviest

// init function

hBrush1= CreateBitmap( 4, 4, 1, 1, ( LPBYTE ) bits1 );

// draw function

HBRUSH hCustomBrush = CreatePatternBrush( hBrush1 );
HBRUSH hOldBrush = ( HBRUSH )SelectObject( hdcBuffer, hCustomBrush );

SetROP2(hdcBuffer, R2_MASKPEN^R2_MASKPENNOT); //test
ExtFloodFill(hdcBuffer,0,0,RGB( 255, 0, 255 ),FLOODFILLBORDER); //test
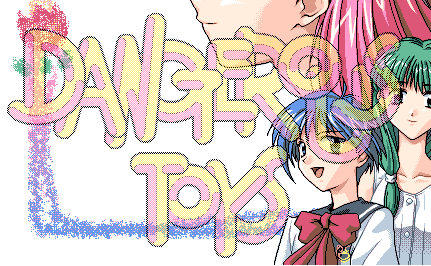
The brush only affects the title graphic and is transparent, allowing whatever is under the bitmap to be visible.

None

Not the solution, but you can't XOR the mix mode flags. The docs say one of the defined values.

Fruny: Ftagn! Ia! Ia! std::time_put_byname! Mglui naflftagn std::codecvt eY'ha-nthlei!,char,mbstate_t>

Advertisement

@endurion

I have tried XORing the flags and get different results. Probably a case of undefined behaviour? None of the docs really talk about XORing two modes together. Anyway, I finally understand how this effect is done, and it's pretty simple. I switched out one graphic for another, ran the program and saw that it uses two versions of the same background; one without the heading, and one with the heading. My solution based on this is as follows:

  1. Create bitmap objects for both backgrounds
  2. Create the pattern
  3. Create a temporary memory DC
  4. Put the second bitmap (with heading) into this DC
  5. Draw the pattern over this bitmap
  6. Put the complete result into a new DC
  7. Blit the first background to the screen DC with BitBlt
  8. Blit the new background-with-pattern on top of the first one using TransparentBlt for the colour of the pattern to be transparent

That's it. I may not have explained this too well, but it's the most logical solution apart from actually loading in a bunch of sprites to simulate the effect, which would only serve to bloat the exe.

None

This topic is closed to new replies.

Advertisement