Learn about Unity ML-Agents in this article by Micheal Lanham, a tech innovator and an avid Unity developer, consultant, manager, and author of multiple Unity games, graphics projects, and books.
Unity has embraced machine learning and deep reinforcement learning in particular, with the aim of producing a working seep reinforcement learning (DRL) SDK for game and simulation developers. Fortunately, the team at Unity, led by Danny Lange, has succeeded in developing a robust cutting-edge DRL engine capable of impressive results. Unity uses a proximal policy optimization (PPO) model as the basis for its DRL engine; this model is significantly more complex and may differ in some ways.
This article will introduce the Unity ML-Agents tools and SDK for building DRL agents to play games and simulations. While this tool is both powerful and cutting-edge, it is also easy to use and provides a few tools to help us learn concepts as we go. Be sure you have Unity installed before proceeding.
Installing ML-Agents
In this section, we cover a high-level overview of the steps you will need to take in order to successfully install the ML-Agents SDK. This material is still in beta and has already changed significantly from version to version. Now, jump on your computer and follow these steps:
Be sure you have Git installed on your computer; it works from the command line. Git is a very popular source code management system, and there is a ton of resources on how to install and use Git for your platform. After you have installed Git, just be sure it works by test cloning a repository, any repository.
Open a command window or a regular shell. Windows users can open an Anaconda window.
Change to a working folder where you want to place the new code and enter the following command (Windows users may want to use C:\ML-Agents):
git clonehttps://github.com/Unity-Technologies/ml-agentsThis will clone the ml-agents repository onto your computer and create a new folder with the same name. You may want to take the extra step of also adding the version to the folder name. Unity, and pretty much the whole AI space, is in continuous transition, at least at the moment. This means new and constant changes are always happening. At the time of writing, we will clone to a folder named ml-agents.6, like so:
git clone https://github.com/Unity-Technologies/ml-agents ml-agents.6Create a new virtual environment for ml-agents and set it to 3.6, like so:
#Windows
conda create -n ml-agents python=3.6

#Mac
Use the documentation for your preferred environment
Activate the environment, again, using Anaconda:
activate ml-agentsInstall TensorFlow. With Anaconda, we can do this using the following:
pip install tensorflow==1.7.1Install the Python packages. On Anaconda, enter the following:
cd ML-Agents #from root folder
cd ml-agents or cd ml-agents.6  #for example
cd ml-agents
pip install -e . or pip3 install -e .
This will install all the required packages for the Agents SDK and may take several minutes. Be sure to leave this window open, as we will use it shortly.
This should complete the setup of the Unity Python SDK for ML-Agents. In the next section, we will learn how to set up and train one of the many example environments provided by Unity.
Training an agent
We can now jump in and look at examples where deep reinforcement learning (DRL) is put to use. Fortunately, the new agent's toolkit provides several examples to demonstrate the power of the engine. Open up Unity or the Unity Hub and follow these steps:
- Click on the Open project button at the top of the Project dialog.
- Locate and open the UnitySDK project folder as shown in the following screenshot:
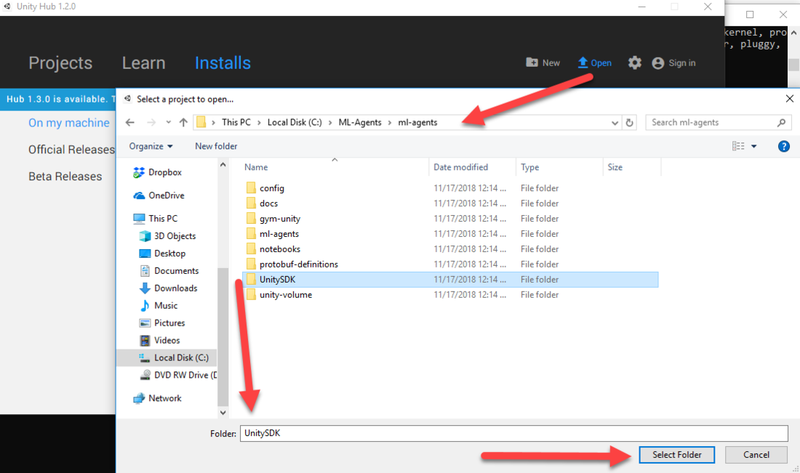
Opening the Unity SDK Project
- Wait for the project to load and then open the Project window at the bottom of the editor. If you are asked to update the project, say yes or continue. Thus far, all of the agent code has been designed to be backward compatible.
- Locate and open the GridWorld scene as shown in this screenshot:
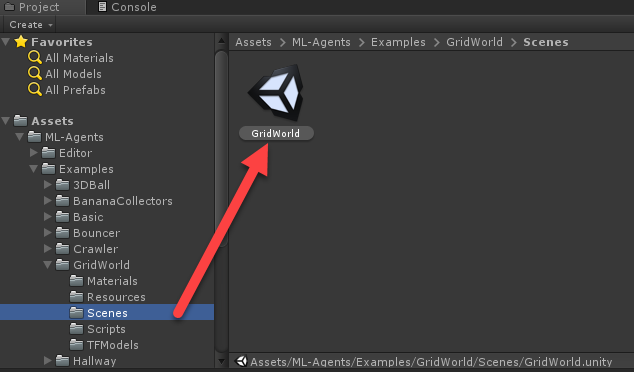
Opening the GridWorld example scene
- Select the GridAcademy object in the Hierarchy window.
- Then direct your attention to the Inspector window, and beside the Brains, click the target icon to open the Brain selection dialog:
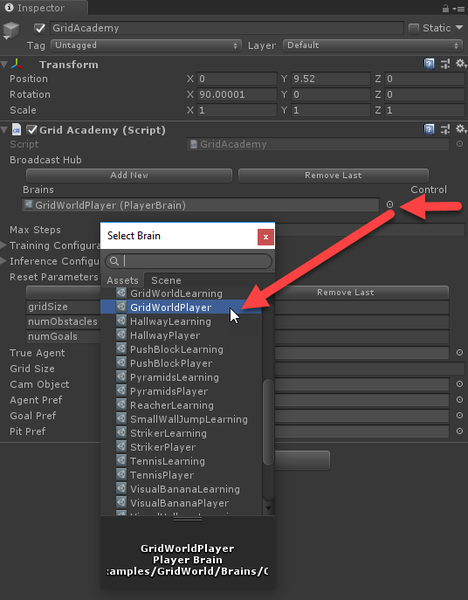
Inspecting the GridWorld example environment
- Select the GridWorldPlayer brain. This brain is a player brain, meaning that a player, you, can control the game.
- Press the Play button at the top of the editor and watch the grid environment form. Since the game is currently set to a player, you can use the WASD controls to move the cube. The goal is much like the FrozenPond environment we built a DQN for earlier. That is, you have to move the blue cube to the green + symbol and avoid the red X.
Feel free to play the game as much as you like. Note how the game only runs for a certain amount of time and is not turn-based. In the next section, we will learn how to run this example with a DRL agent.
What's in a brain?
One of the brilliant aspects of the ML-Agents platform is the ability to switch from player control to AI/agent control very quickly and seamlessly. In order to do this, Unity uses the concept of a brain. A brain may be either player-controlled, a player brain, or agent-controlled, a learning brain. The brilliant part is that you can build a game and test it, as a player can then turn the game loose on an RL agent. This has the added benefit of making any game written in Unity controllable by an AI with very little effort.
Training an RL agent with Unity is fairly straightforward to set up and run. Unity uses Python externally to build the learning brain model. Using Python makes far more sense since as we have already seen several DL libraries are built on top of it. Follow these steps to train an agent for the GridWorld environment:
- Select the GridAcademy again and switch the Brains from GridWorldPlayer to GridWorldLearning as shown:
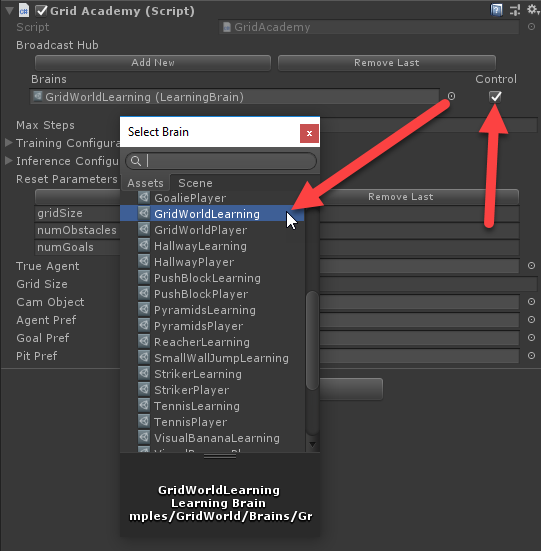
Switching the brain to use GridWorldLearning
- Click on the Control option at the end. This simple setting is what tells the brain it may be controlled externally. Be sure to double-check that the option is enabled.
- Select the trueAgent object in the Hierarchy window, and then, in the Inspector window, change the Brain property under the Grid Agent component to a GridWorldLearning brain:
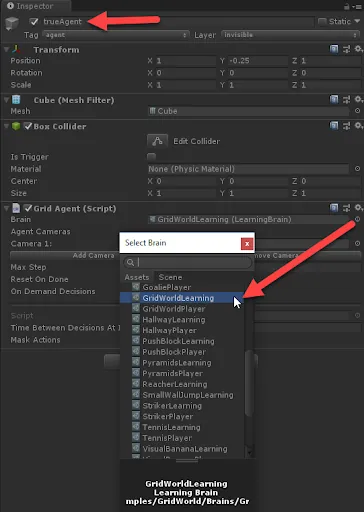
Setting the brain on the agent to GridWorldLearning
- For this sample, we want to switch our Academy and Agent to use the same brain, GridWorldLearning. Make sure you have an Anaconda or Python window open and set to the ML-Agents/ml-agents folder or your versioned ml-agents folder.
- Run the following command in the Anaconda or Python window using the ml-agents virtual environment:
mlagents-learn config/trainer_config.yaml --run-id=firstRun --train - This will start the Unity PPO trainer and run the agent example as configured. At some point, the command window will prompt you to run the Unity editor with the environment loaded.
- Press Play in the Unity editor to run the GridWorld environment. Shortly after, you should see the agent training with the results being output in the Python script window:
.png.009fe700b222e85ac8dd294f3b7360ec.webp)
Running the GridWorld environment in training mode
- Note how the mlagents-learn script is the Python code that builds the RL model to run the agent. As you can see from the output of the script, there are several parameters, or what we refer to as hyper-parameters, that need to be configured.
- Let the agent train for several thousand iterations and note how quickly it learns. The internal model here, called PPO, has been shown to be a very effective learner at multiple forms of tasks and is very well suited for game development. Depending on your hardware, the agent may learn to perfect this task in less than an hour.
Keep the agent training and look at more ways to inspect the agent's training progress in the next section.
Monitoring training with TensorBoard
Training an agent with RL or any DL model for that matter is not often a simple task and requires some attention to detail. Fortunately, TensorFlow ships with a set of graph tools called TensorBoard that we can use to monitor training progress. Follow these steps to run TensorBoard:
- Open an Anaconda or Python window. Activate the ml-agents virtual environment. Don't shut down the window running the trainer; we need to keep that going.
- Navigate to the ML-Agents/ml-agents folder and run the following command:
tensorboard --logdir=summaries - This will run TensorBoard with its own built-in web server. You can load the page using the URL that is shown after you run the previous command.
- Enter the URL for TensorBoard as shown in the window, or use localhost:6006 or machinename:6006 in your browser. After an hour or so, you should see something similar to the following:
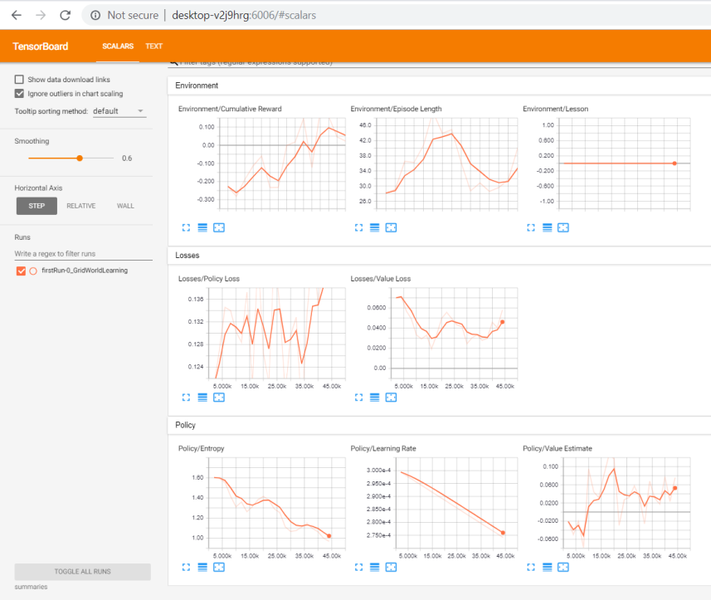
The TensorBoard graph window
- In the preceding screenshot, you can see each of the various graphs denoting an aspect of training. Understanding each of these graphs is important to understand how your agent is training, so we will break down the output from each section:
- Environment: This section shows how the agent is performing overall in the environment. A closer look at each of the graphs is shown in the following screenshot with their preferred trend:

A closer look at the Environment section plots
- Cumulative Reward: This is the total reward the agent is maximizing. You generally want to see this going up, but there are reasons why it may fall. It is always best to maximize rewards in the range of 1 to -1. If you see rewards outside this range on the graph, you also want to correct this as well.
- Episode Length: It usually is a better sign if this value decreases. After all, shorter episodes mean more training. However, keep in mind that the episode length could increase out of need, so this one can go either way.
- Lesson: This represents which lesson the agent is on and is intended for Curriculum Learning.
- Losses: This section shows graphs that represent the calculated loss or cost of the policy and value. A screenshot of this section is shown next, again with arrows showing the optimum preferences:
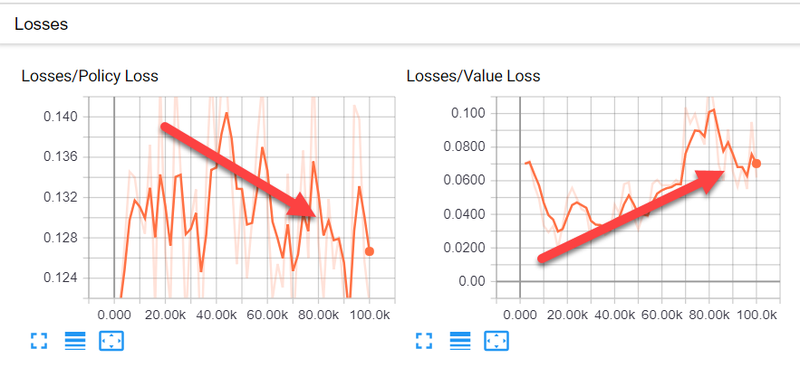
Losses and preferred training direction
- Policy Loss: This determines how much the policy is changing over time. The policy is the piece that decides the actions, and in general, this graph should be showing a downward trend, indicating that the policy is getting better at making decisions.
- Value Loss: This is the mean or average loss of the value function. It essentially models how well the agent is predicting the value of its next state. Initially, this value should increase, and then after the reward is stabilized, it should decrease.
- Policy: PPO uses the concept of a policy rather than a model to determine the quality of actions. The next screenshot shows the policy graphs and their preferred trend:

Policy graphs and preferred trends
- Entropy: This represents how much the agent is exploring. You want this value to decrease as the agent learns more about its surroundings and needs to explore less.
- Learning Rate: Currently, this value is set to decrease linearly over time.
- Value Estimate: This is the mean or average value visited by all states of the agent. This value should increase in order to represent the growth of the agent's knowledge and then stabilize.
6. Let the agent run to completion and keep TensorBoard running.
7. Go back to the Anaconda/Python window that was training the brain and run this command:
mlagents-learn config/trainer_config.yaml --run-id=secondRun --train8. You will again be prompted to press Play in the editor; be sure to do so. Let the agent start the training and run for a few sessions. As you do so, monitor the TensorBoard window and note how the secondRun is shown on the graphs. Feel free to let this agent run to completion as well, but you can stop it now if you want to.
In previous versions of ML-Agents, you needed to build a Unity executable first as a game-training environment and run that. The external Python brain would still run the same. This method made it very difficult to debug any code issues or problems with your game. All of these difficulties were corrected with the current method.
Now that we have seen how easy it is to set up and train an agent, we will go through the next section to see how that agent can be run without an external Python brain and run directly in Unity.
Running an agent
Using Python to train works well, but it is not something a real game would ever use. Ideally, what we want to be able to do is build a TensorFlow graph and use it in Unity. Fortunately, a library was constructed, called TensorFlowSharp that allows .NET to consume TensorFlow graphs. This allows us to build offline TFModels and later inject them into our game. Unfortunately, we can only use trained models and not train in this manner, at least not yet.
Let's see how this works using the graph we just trained for the GridWorld environment and use it as an internal brain in Unity. Follow the exercise in the next section to set up and use an internal brain:
- Download the TFSharp plugin from here
- From the editor menu, select Assets | Import Package | Custom Package...
- Locate the asset package you just downloaded and use the import dialogs to load the plugin into the project.
- From the menu, select Edit | Project Settings. This will open the Settings window (new in 2018.3)
- Locate under the Player options the Scripting Define Symbols and set the text to ENABLE_TENSORFLOW and enable Allow Unsafe Code, as shown in this screenshot:
.png.0a29e72a5d4d2ffaf4e69c1c77cffc2d.webp)
Setting the ENABLE_TENSORFLOW flag
- Locate the GridWorldAcademy object in the Hierarchy window and make sure it is using the Brains | GridWorldLearning. Turn the Control option off under the Brains section of the Grid Academy script.
- Locate the GridWorldLearning brain in the Assets/Examples/GridWorld/Brains folder and make sure the Model parameter is set in the Inspector window, as shown in this screenshot:
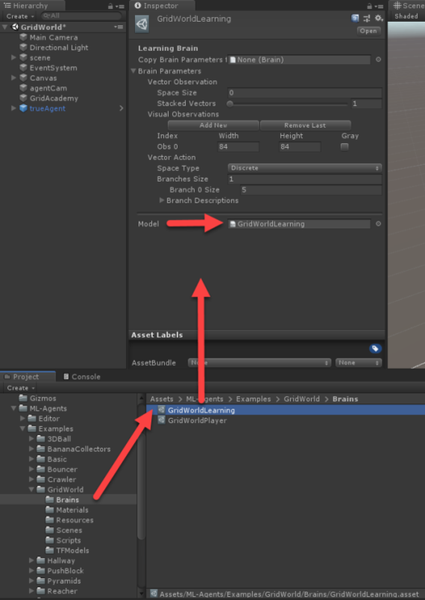
Setting the model for the brain to use
- The Model should already be set to the GridWorldLearning model. In this example, we are using the TFModel that is shipped with the GridWorld example.
- Press Play to run the editor and watch the agent control the cube.
Right now, we are running the environment with the pre-trained Unity brain. In the next section, we will look at how to use the brain we trained in the previous section.
Loading a trained brain
All of the Unity samples come with pre-trained brains you can use to explore the samples. Of course, we want to be able to load our own TF graphs into Unity and run them. Follow the next steps in order to load a trained graph:
- Locate the ML-Agents/ml-agents/models/firstRun-0 folder. Inside this folder, you should see a file named GridWorldLearning.bytes. Drag this file into the Unity editor into the Project/Assets/ML-Agents/Examples/GridWorld/TFModels folder, as shown:

Dragging the bytes graph into Unity
- This will import the graph into the Unity project as a resource and rename it GridWorldLearning 1. It does this because the default model already has the same name.
- Locate the GridWorldLearning from the brains folder and select it in the Inspector windows and drag the new GridWorldLearning 1 model onto the Model slot under the Brain Parameters:
.png.e7bc8fa823cd711dc18660ceab720c9e.webp)
Loading the Graph Model slot in the brain
- We won't need to change any other parameters at this point, but pay special attention to how the brain is configured. The defaults will work for now.
- Press Play in the Unity editor and watch the agent run through the game successfully.
- How long you trained the agent for will really determine how well it plays the game. If you let it complete the training, the agent should be equal to the already trained Unity agent.
If you found this article interesting, you can explore Hands-On Deep Learning for Games to understand the core concepts of deep learning and deep reinforcement learning by applying them to develop games. Hands-On Deep Learning for Games will give an in-depth view of the potential of deep learning and neural networks in game development.


