Advertisement

How to make art like that?

Started by May 26, 2018 03:24 AM
17 comments, last by Kryzon 6 years, 6 months ago

I saw a video which uses elegant and simple art at the same time which I'd love my game to look like. https://youtu.be/P5e7cl19Ha0   The art seems so simple that it looks easy, and I tried, but I have very little art skill and I can't do something as good.

Is this kind of art doable by a non-art person? How can I learn to do that? How long can I improve from zero art skill to making good simple art like that? I say simple from an non-artist point of view, but is it? What kind of software do artists use to draw and animate characters like that?

1 hour ago, Michael Aganier said:

How long can I improve from zero art skill to making good simple art like that?

The art style is known as vector art, Vector art should be a good choice for a new artist. Improving takes study and practice, not much that can be done about that. :)

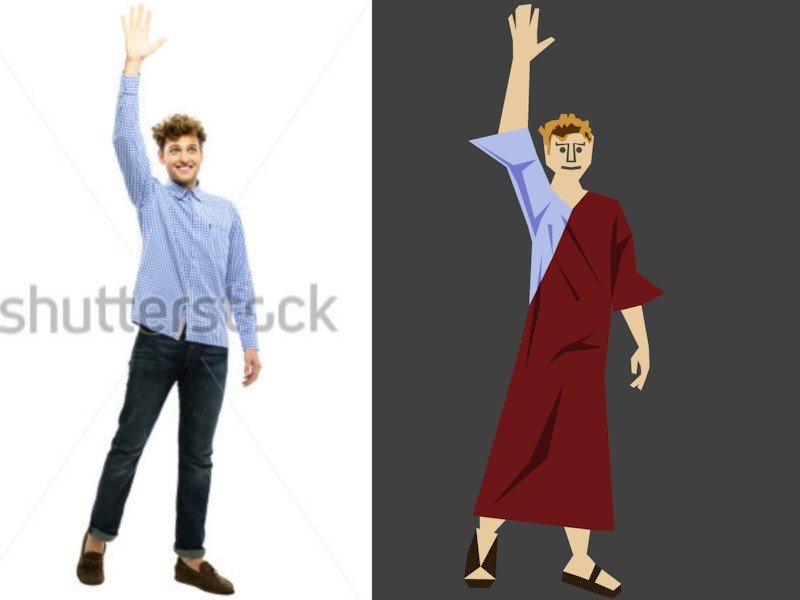
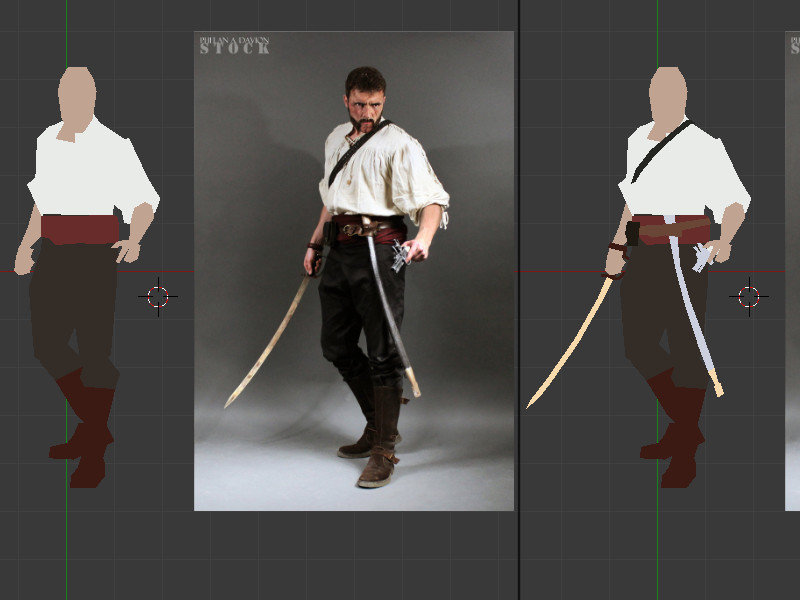
Since you probably won't be planning on learning anatomy you should draw over stuff, like this:

VectorArt.jpg.334e21eb3e56aaf62b9b142fc6535b8f.jpg

The only tips I can give you is that vector art gets narrow near joints to make them visible.

If you need animations you will need to draw over videos and you will need vector software that can do animations. Photoshop can if you have it, Blender is what I used above; took longer to find the image than to draw it.

For animations you could also use 3D animations from motion capture and from animation sites, then draw 2D over that.

Advertisement

That's pretty cool.

1 hour ago, Scouting Ninja said:

Blender is what I used above;

When I think of vector graphics, I always thought of inkscape and illustrator. What is the advantage of using a modelling software like Blender?

2 hours ago, Michael Aganier said:

What is the advantage of using a modelling software like Blender?

3D vectors. Besides that 3D modeling tools have much more options related to the vector graphics. Something to remember is that 2D vector graphics in a game is 3D models, often the Z axis is only used as a depth setting.

As a example, if you used Spline for bone animations it would import into Unity as a flat 3D model.


Getting high quality animation is easier in 3D software. Because of refined bones systems and access to well developed animation tools. All kinds of texture baking can be used, including normal maps. Easy importing as almost all engines supports FBX or OBJ. Easy and cost effective morphing.

Manual setup of the mesh also allows for more optimized meshes.

Using 3D software to make 2D art is good practice for people looking to eventually expand into 3D gaming.


One reason not to use 3D software is complexity. For example baking a atlas in 3D software takes a know how, it isn't difficult but isn't obvious.

Good info. I started learning blender with the wiki book Noob To Pro. I've readed all of section 1, though it's only about basics and interface.

On 5/26/2018 at 1:16 AM, Scouting Ninja said:

If you need animations you will need to draw over videos and you will need vector software that can do animations. Photoshop can if you have it, Blender is what I used above; took longer to find the image than to draw it.

What I had in mind is to make characters with the same general shape so that they can be rigged to the same skeleton. I want to make 1 animated skeleton and be able to use it to animate multiple characters and export them into spritesheets. Is that possible with blender?

Also, could you describe how you've done your vector character? Is the whole model 1 piece? Did you made each pieces separately? What kind of lighting did you render with? I'd love to see in action how you go through that process.

Advertisement
3 hours ago, Michael Aganier said:

to make 1 animated skeleton and be able to use it to animate multiple characters and export them into spritesheets. Is that possible with blender?

Yes, all good 3D software can do this. If you want to to target different proportions you will also need to learn the Inverse Kinematics in Blender. It takes a while but once you know how to use it, you will be able to make animations at a faster and easier.

3 hours ago, Michael Aganier said:

Also, could you describe how you've done your vector character? Is the whole model 1 piece? Did you made each pieces separately? What kind of lighting did you render with? I'd love to see in action how you go through that process.

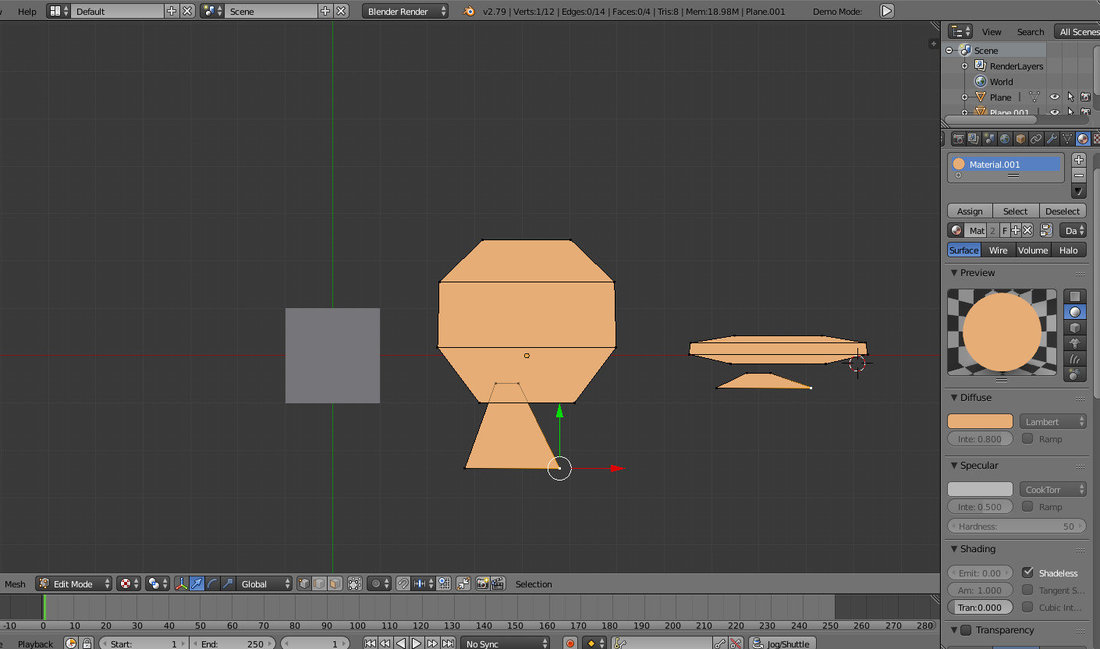
I used a flat plane. Then in edit mode shaped it by moving vertices around and extruding edges where I wanted.
HowToVector.thumb.jpg.14e5e36c33c3f68cc46cf34e73d410f9.jpg

Use the move, rotate and scale tools to move your vertices in Edit Mode (TAB_KEY), to edit a plane like the one in the left of the image.

To the right you can see it rotated it to show what it looks like. Parts that should be under parts, should really be under them.

You can see my material would be a single color with "Shadles" enabled for a flat single color look. All the parts of the same color would share a material.


In edit mode, select a vertice (right click), then hold down the CTRL key, then click somewhere to "draw" a vertice. F_key allows you to fill 3 or more vertices to make a polygon.

Unfortunately I deleted the one I made and right now I am a bit busy. Tomorrow I will make a proper example for you. The above should help you a bit for now.

3 hours ago, Michael Aganier said:

I've readed all of section 1, though it's only about basics and interface.

Just remember that Blender's real interface is your keyboard. They take the stuff that normally bloats the screen and move it down to the keyboard.

Most of your buttons are centered around "WASD", just like a game. If you mess up: Shift+C is the camera reset, it also Resets the cursor.


OK, a lot of images, I hope it helps. I decided on images as gifs are would have been too much and I can't make a video in my sleepy condition. I hope it doesn't break the forum :) .

Grab the reference image from: https://phelandavion.deviantart.com/art/Pirate-STOCK-I-527928432 Diviantart has a lot of good images. I choose this one because it has some depth and details to work with.


Tutorial 1) setup:

Spoiler


SetupPart1.thumb.jpg.b0b11e1bd1d5b0b1e3ac8479abe6c275.jpg

Open Blender and delete all the objects in the scene. Next use the Blender "Import Image As Plains" addon. It is packed with Blender but maybe not turned on. Go to User Preferences-> Addons-> Import-Export and turn it on if it isn't.

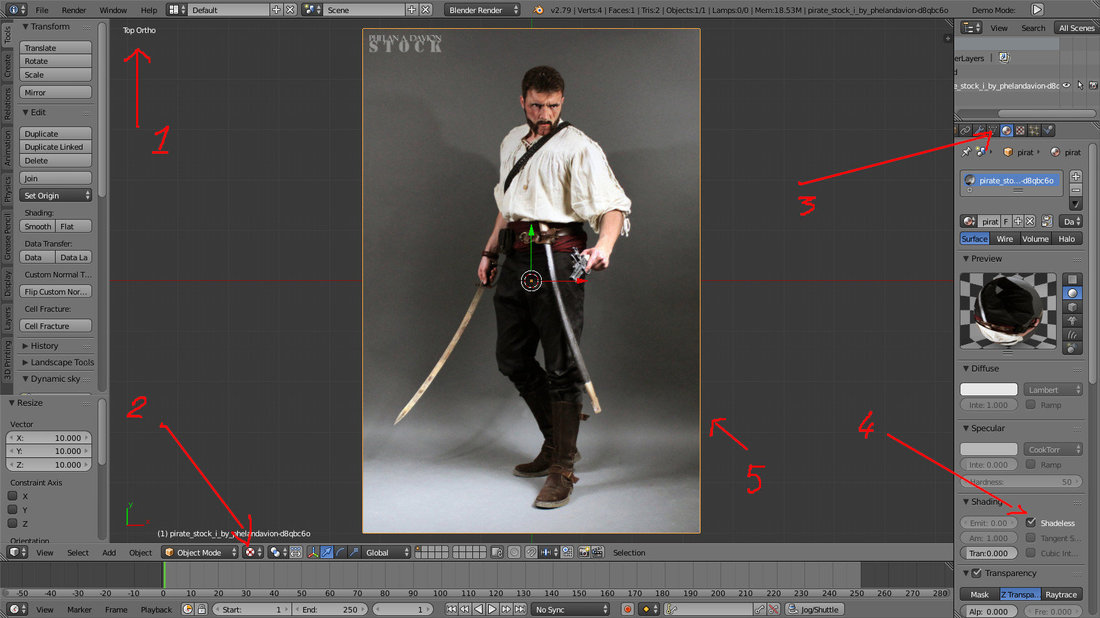
SetupPart2.thumb.jpg.cb24bfdab2ec2f97f759991051333107.jpg

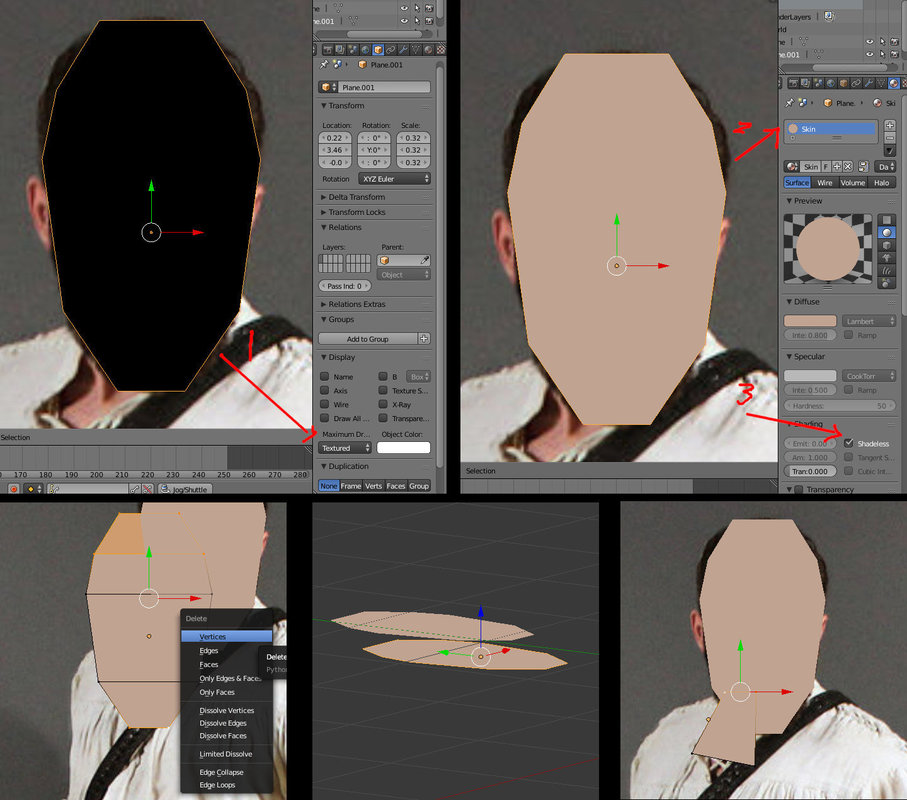
This image shows a few steps that you need to follow:

Step 1) Use Numpad_7 to switch to top view. Then press Numpad_5 to switch from perspective to orthographic.

Step 2) Switch to Texture viewport shading. The image you imported will be black. If it is already showing a image then that is OK, just skip the next two steps.

Step 3) Go to the material tab and select the material.

Step 4) Set the material to shadles.

Step 5) Scale the image by hitting the S_Key. Type 10 and the image will scale by ten. Left click to accept.

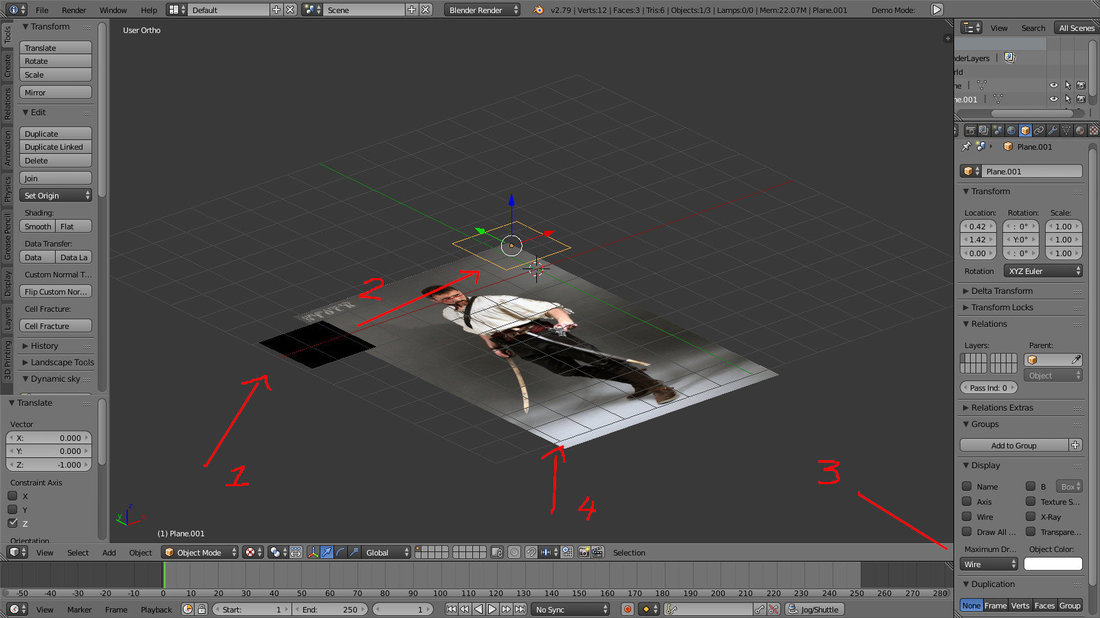
SetupPart3.thumb.jpg.8b20b62792563ee2bedd5c3a6572fdf8.jpg

Last Part.

1.) Add a Plane to the scene using Shift_A , it's OK if it is black.

2.) Duplicate with Shift_D and Move it over the image you imported. To move along the grid you can hold down CTRL.

3.) Under the Object tab find "Maximum Draw Type" and set it to wire. This allows you to change only the viewport render of the object; a very useful thing. Your plane is now a wire version of the 

4.) Move the image down to allow you some space to work. Yay! We are done.with the setup.


Now we can really get started. The tutorial will speedup as I assume you learned what to do.

Tutorial 2) The basics of vector drawing in Blender:

Spoiler


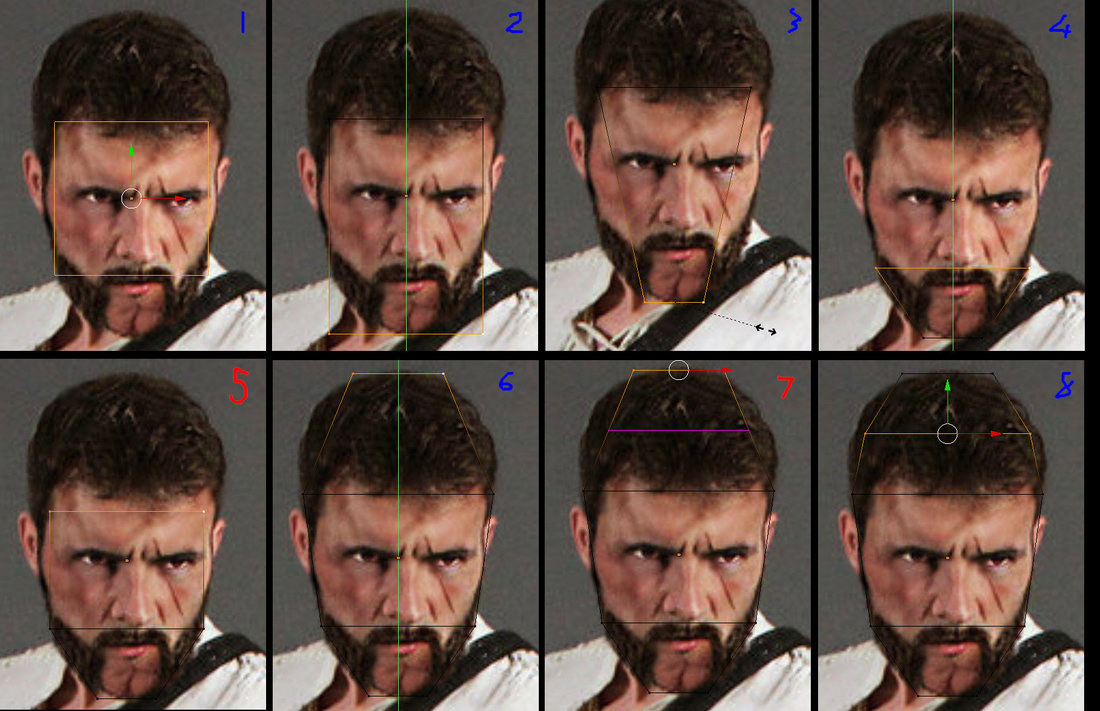
DrawingPart1.thumb.jpg.3b67b6813b8743a69d3b79b0753fb2dd.jpg

1) Shows how I move the plane to the face using the grab key G_Key. Then scaling it to fit the face using the scale key S_Key.

2) I enter edit mode Tab_key. I then use right click to select the two lower vertices. Using the green transform widget on the screen I move the vertices down to the jaw level.

3) Has me scaling the vertices with the S_key, by moving the mouse I get the vertices to a rough outline of the jaw.

4) I moved the top two vertices down, to cover the jaw, right where the jawbone ends. I also use some scaling to fit it better.

5) Using E_Key with two top vertices selected, extrudes a edge out. While holding down CTRL I snap move the two neer to the forehead. I can't exactly get there with snap, but I don't want them moving to the side either.

6.) I moved the vertices up using the green widget again. Then extruded two more and moved them into place. Here I mimic the shape of the skull, scaling to get a impression of a oval.

7.) Using CTRL_R I add a loop, the purple line. I click it down with Left-Click. Then I use CTRL to center the sliding edge and Left-Click again when happy.

8.) Last I scale the line to fit the head.

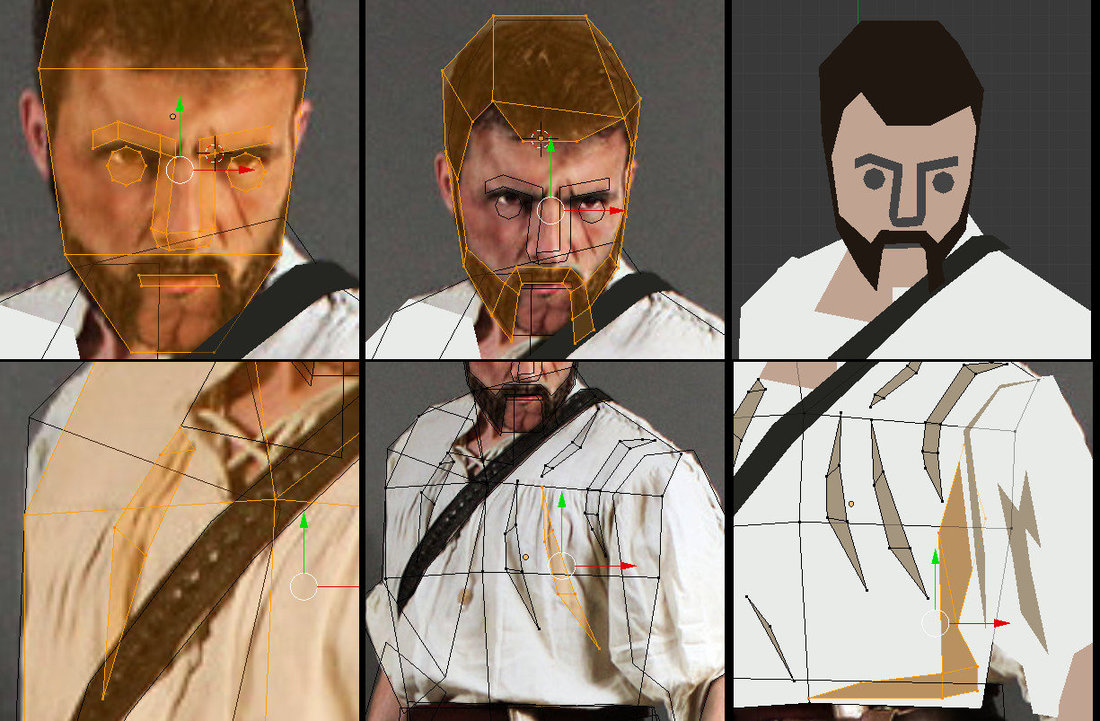
DrawingPart2.thumb.jpg.8027ddbe438be4fdbe8f07d20fb8dc8f.jpg

1,) Now that I have a head I switch it's "Maximum Draw Type" to textured.

2.) I add a shales skin color texture that I feel matches the average skin tone of the character.

3.) I move the head down. (middle image, sorry I am tired :) ).

4.) I delete the vertices except 4, to use as the neck. (left image)

5.) Last the vertices is moved in place,  I also scale the neck very thin as it is a overlapping joint.


Tutorial 3) The drawing the body and speeding up:

Spoiler


DrawingPart3.thumb.jpg.be9baba9f75fd7add930c3ec035aea39.jpg

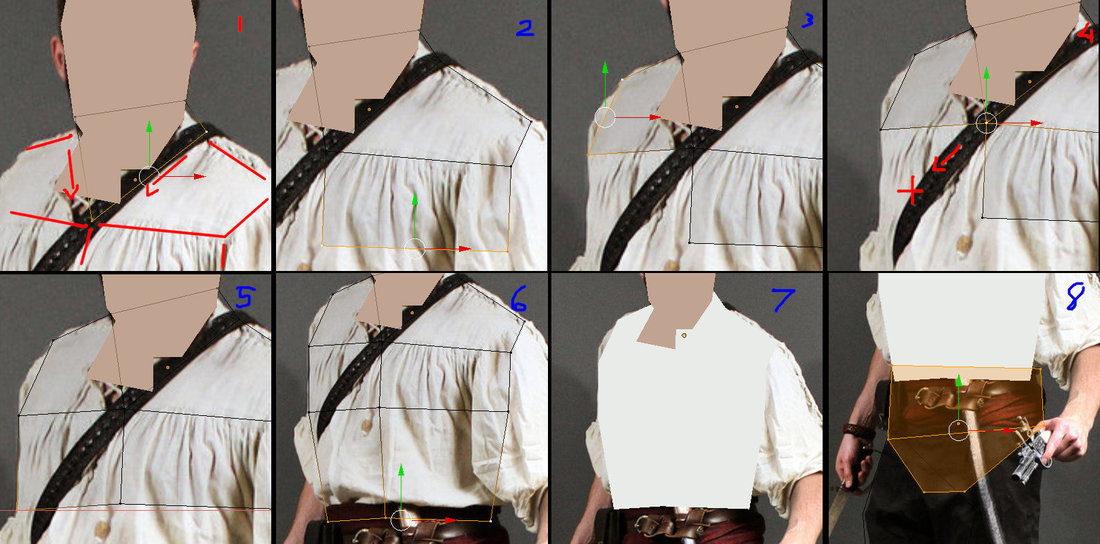
1.) After moving a duplicate of the black plain and changing it to wired. I move it below the neck and move the 4 vertices in a diamond shape. This allows me to extrude edges for the shoulders.

4.) After extruding I endup with a polygon that is missing. Extruding it would be a pain, because I need to merge. Lucky I have the Blender "F2" addon enabled. This allows me to aim what side I want a polygon, then hit F_Key to spawn a face that is calculated from the nearby vertices.

8.) I finish the rest of the shirt and then make a quick part for the pants, The legs will overlap this under pants shape.


Tutorial 4) Multi materials on a mesh:

Spoiler


DrawingPart4.thumb.jpg.0a8bd33d3bf3748525031288eb677a28.jpg

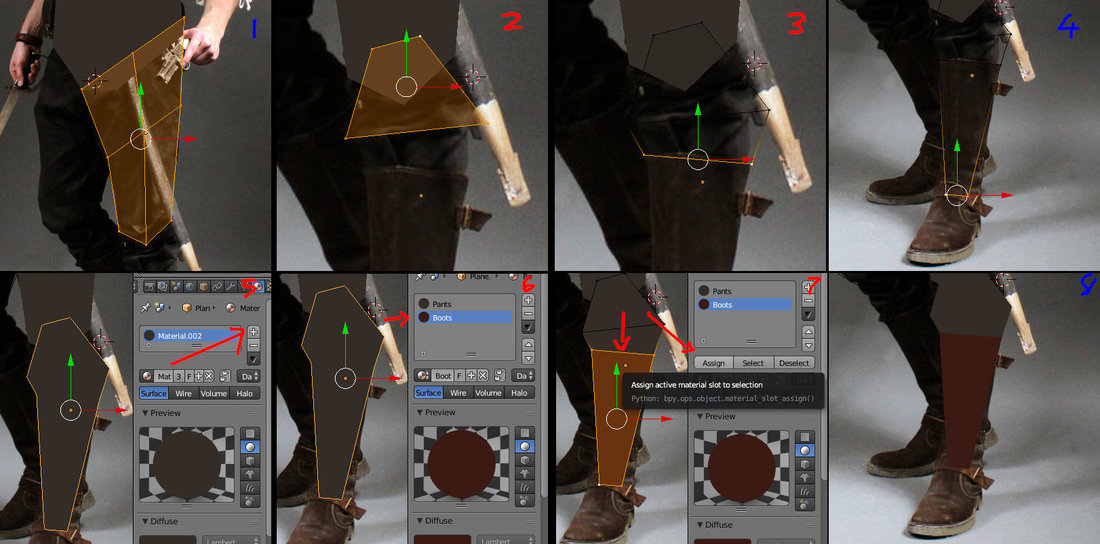
1.) The leg is made like the rest, with a loop used in the middle of two extrudes to make a round joint.Remember that the leg has to be above the underpants part.

2.) The part under the leg has to be narrow, to show it is a joint.

3.) Here a line is made to show where the boots start. Making the boots and legs one part is better. 4.) Finish with a narrow joint.

5.) In the material tab hit the + icon to add one more material to the mesh.

6.) Selecting and make it shadles with a good boot color. I used a bit of red because brown looked too much like the pants.

7.) Select the vertices that should be part of the boot. Then use the "Assign" button that only appears in edit mode.

8.) Now you know how to use more than one material. To remove a material in object mode hit the - icon. You can have as many materials as you want.


Tutorial 5) Finishing the rest:

Spoiler


DrawingPart5.thumb.jpg.f4fb01a097fd117580925d734618d1be.jpg

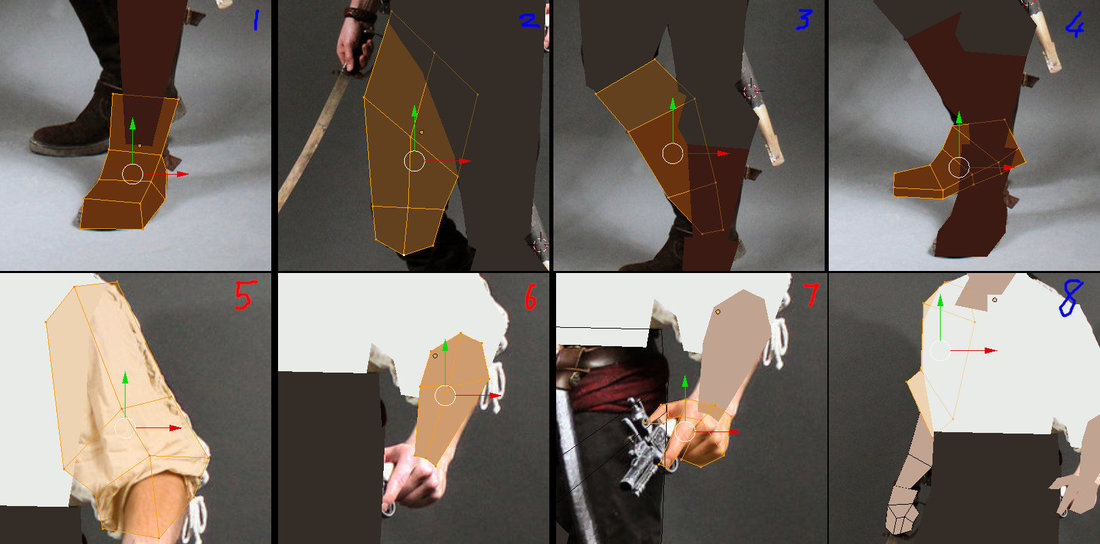
5.) The arm I didn't end in a narrow point. Instead I choose to bulk it out. This way the narrow arm will indicate the joint. A loop was used to round it.

6.) a narrow joint is used to end the arm, because the hand overlap needs to be shown.

7.) It's good practice to show the thumb and index finger while merging the rest. This prevents Banana finger and keeps things simple.

8.) I finished the arm using the same steps as the other arm. Remember that this arm needs to be behind the other arm.


DrawPart6.jpg.ae8ab865fd9b8b646ac25dc7eac5cd80.jpg

When you zoom out it should look something like this now. Already it is a good faceless character that can be used for a enemy.

Using everything we learned above we can add some details. Just remember to check the depth of the details to see if they fit.

Tutorial 7.) The last part, refined details:

Spoiler


DrawPart7.thumb.jpg.90e82d1edc3e03c695ba891266ffdc57.jpg

1.) To add details go to the mesh that the details will be over. Duplicate a vert using Shift_D and move it just slightly above the mesh. Then extrude etc.

For the eyes I moved the cursor to a vertice Shift_S -> Cursor to selection. Then I added two circles of 8 vertices.

2.) The hair is a separate polygon. A thing to note is that it must cover the skull, it would looks strange if you could see the skull under it.

3.) The mouth, nose and eyes where all given a slight gray color, using the multi material trick.

4-6.) Adding the folds is very easy. Again I just duplicate a vertice and move it up. Then I look for folds on the cloths and mimic them in a low detail way.

The only tips I really know about folds is: They have to follow the body underneath and they can be used to show where parts overlap.


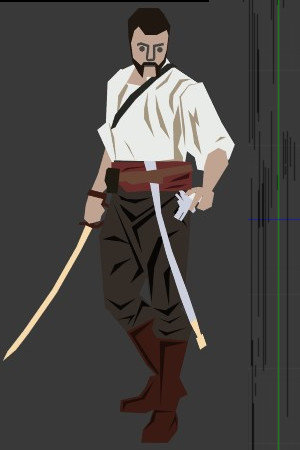
This is the front and side view of the final character:

Character.jpg.6e194bf1b57d95cfa11fde06a3ee25e8.jpg

A lot of this just takes practice, not really much to explain.

Extra, to fix stuff:

If you do need to merge vertices it is CTRL_M. If you want to flatten vertices you can use scaling to do it. Under the screen is a "Mesh" Menu, there is a "Cleanup" sub menu that is very important for cleaning the mesh from extra and loose vertices.

The Blend file, (Blender 2.79): Vector.blend


I really hope this is useful.

This is really great @Scouting Ninja, thanks a lot for the effort. I'm reading your tutorials along way the book I mentioned. I'll show some results as soon as possible.

This topic is closed to new replies.

Advertisement