With this second tutorial I'll try to correct a few things I did wrong the first time. Let me start of with apologizing for some of the errors of the sourcecode which came with the first tutorial. Thanks to all of you who attended me on some of those errors. But although I really do appreciate your comments (and keep sending them !) the code is not intended to be very good... Most of the code that I published was only the first (working) version of the procedures. I did this to make sure all of you out there do not just copy and paste my code but you start coding yourself. As you will soon discover it feels much more rewarding if you coded the biggest part yourself. To fully understand code that someone else has writing is almost impossible !
I'll also talk about somethings that in the first tutorial I assumed you all already knew like setting up the compiler. I just want to make this tutorial as complete as possible. For all of you already compiling your own glide programs, just skip that part.
Finally I must admit that the tutorials don't really contain a really good storyline. The subjects don't really follow a chronological order. I'll be doing a revision of all tutorial when I have written some more. OK, now let's go back to our subject.
[size="5"]Setting Up The Compiler
I must admit that almost all sites that have something to do with programming 3dfx have a small tutorial on who to set the compiler up, but I got quite some question on this subject ( hope everything is working now Maxman ) so I'll give my version of it as well. It is a copy of a mail I wrote for someone. Just skip this part if you already can compile your programs. I assume you are using Microsoft Visual C++, but if you are using another compiler the procedure should be almost the same.
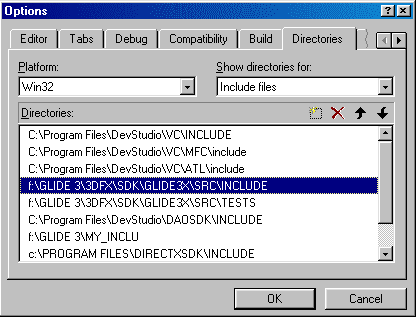
Be sure to have your include and library directories correctly configured. You only have to do this the first time. To do this do the following:
- Go to the Tools menu and click Options. Now click the Directories tab and add the directories where MSVC can find your Glide SDK.
- Under "Show directories for:" select "Include files" and add the directory for the includes. This should be something like
X:\GLIDE 3\3DFX\SDK\GLIDE3X\SRC\INCLUDE - Now select show Library files and add the library directory
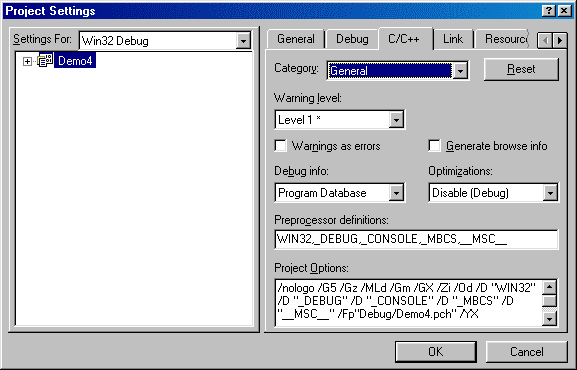
X:\GLIDE 3\3DFX\SDK\GLIDE3X\SRC\LIB\WIN32 Now start a new Workspace. To compile a glide program you always have to start a project. As I'm not a really good windows programmer I use Console Applications. Just open a new Workspace and start a console application. After MSVC++ has made some files and directories, go to the PROJECT menu and click SETTINGS. Now do the following:
- Go to the C/C++ and add __MSC__ to the Preprocessor definitions.
THESE ARE 2 UNDERSCORES ON EITHER SIDE !!! --> ( " _ _ MSC _ _ " ). When I started programming Glide it took me 2 weeks of frustration to find this out! - Set the Warning level to Level 1.
- Now go to Code Generation (still under the C/C++ tab ) and set the Processor to Pentium and Calling convention to __stdcall.
- Click the Link tab and add glide3x.lib to the Object/library modules. MSVC is now configured correctly and you should be able to compile your own glide programs.
So far for Compiler-stuff. Give me a minute to start a cd ( Buckshot Lefonque "Music Evolution" )...much better. I hate silence !
Now let us make the giant leap to loading textures. See my first tutorial for subjects concerning problems that fit between compiler setup and loading texuremaps.
[size="5"]Texture Maps and How To Load Them
For all of you who don't know what texture mapping is ( but I think most of you already know ) I'll explain it in short. Texture mapping is a technique used to greatly increase the detail of objects without the need for complex geometric transformations. These textures can be realtime or prerendered images. There are about a dozen techniques to accomplish this but I will limit myself to the most commonly used method, as we are dealing with glide and glide does most of the hard work for us.
Back in the old days we had to do texture mapping ourselves. The basic idea is take a image, transform it in some way and render it onto a triangle. Sounds easy ? Well, with glide it is...but getting it to run smoothly in poor old DOS was a nightmare.
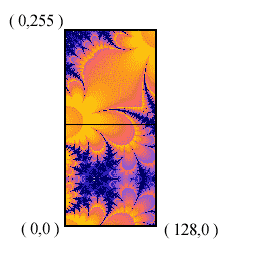
Let me first explain how glide uses textures. Using glide textures have to be square or rectangle arrays of data. Every value in that texture is called a texel and has an address (s,t) each in the range of an 16 bit integer [ -32768...32767 ]. I'll assume you are using Window coordinates, as Clip coordinates seem to give some problems on older Voodoo cards. If we are using Window Coordinates all textures have there longest side texture coordinates running from 0 to 255. The other side of the texture has a length of 255/n where is n = [1,2,4,8]. This makes textures have an aspect ratio 1:1, 1:2, 1:4, 1:8. See the Glide 3.0 programming Guide page 86/87/88 for more details.
The vertexstructure now needs additional information. This information should tell glide the (s,t) coordinates of the specific vertex. Just add GR_PARAM_ST0 to the vertexLayout. See ccombine.zip. The (s,t) (in my code called (u,v) ! ) must be multiplied by (1/Z) before passing them to glide!
Let's take a look at what more glide needs to know and how it should be setup to use textures. We will just have to do two things:- Reconfigure the Colorcombine Unit
- And Point glide to the texture map address (Re)Configuring the colorcombine unit is the simple part. If you are not using texture maps your colorcombinefunction should look something like ccombine.zip. To use texture mapping reconfigure the colorcombine unit as ccombine.zip.
Now comes the hard part. Before we can point glide to the texture map, naturally we should first have a texture map to point to ! Now we could do this in the main loop but that would result in really bad code, so let us write a subroutine which can load one or more texture in to memory.
First we make an Texture map structure to hold texture map information (like dimensions, number of mipmaps, etc. ). The datatype for textureinformation is predifined in glide and called GrTexInfo. All we need now is just a variable to hold the address in the TMU (Teture Map Unit on the Voodoo card!) and a pointer to the texture map data. With this we can construct a very simple datatype to hold a texture map. It should look something like this:Now load the texture map information from the *.3df file using gu3dfGetInfo(FileName,&TexInfo) where TexInfo is a datatype Gu3dfInfo (also predefined in glide. The amount of memory required for the mipmaps can now be read for TexInfo.mem_required. So just malloc that amount of memory at TexInfo.data. When you reserved that memory you can load the texture into TexInfo using gu3dfLoad(FileName,&TexInfo). We would have been ready now if we didn't wrote this loadroutine as a subroutine...typedef struct TextureMap_type
{
GrTexInfo TexInfo;
FxU32 VideoMemoryAddressTMU0;
void *TextureData;
} TextureMap;
If you do write it as a subroutine we have to give our global structs the same values as our local structs. Also, if we want to be able to load multiple texture we have to keep track of the first free address in the TMU. The lowest possible address can be obtained using grTexMinAddress(GR_TMU0). But this always returns the same value as it always just returns the lowest possible offset of the TMU. So lets initialize a global variable named NextTextureOffset and at the beginning of our program give it the value of grTexMinAddress(GR_TMU0). If we load a texture we now simple load that sample at this offset and when we're done we add the size of the just loaded texture to the offset... Simple?
Take a good look at texmap.zip to get a better feeling of what I mean.
Pffff, let me take a break,....Are you still there ?...Finally I've got some good news. If you understood everything I wrote so far,...then the rest of this tutorial will seem very simple...Use the grTexSource command to point to your texture. Its first argument is the value of the Texture map unit where the texture map is located. These can be GR_TMU0, GR_TMU1 or GR_TMU2. Then follow the startaddress (name_of_the_structure->VideoMemoryAddressTMU0), which mipmaplevels can be found at this address (..._EVEN, .._ODD, ..._BOTH ) and format and dimensions of the texture. This last one we loaded into a structure, when we loaded the texture from disk. So simply point glide to your texture using:For some more sourcecode, download the full source at the end of this turorial.grTexSource(GR_TMU0,tex1->VideoMemoryAddressTMU0, GR_MIPMAPLEVELMASK_BOTH, &tex1->TexInfo);
Ps. Many thanks go to Andreas Ingo for writing the Texturemap example source, which can be found at the download section. The biggest part of this code was based upon his work. Thanks !
Well if you servived this you can take on the world ! So let us get busy with some fun stuf
[size="5"]Transparency Effects
Well if you understood everything till here than these effects are really simple! Just setup glide to use texturemaps and enable AlphaBlending. Thats all! grAlphaBlendFunction(GR_BLEND_ONE,GR_BLEND_ONE,GR_BLEND_ONE,GR_BLEND_ZERO)... The color of the "underlaying" triangle determens the intensety and color in which the texture is seen. A totally white triangle will fully add the two image (back and foreground ) together ( 50%, 50% ). If the triangle is gray (50% of total white ) than the result would be 75 % background 25 % foreground.
[size="5"]Lighting Effects
Let us start we the very, very, very cool but over hyped lensflare effect. The basic idea is that when a bright light passes a cameralens a reflection of the diafragma can be seen. But you really don't want to render this effect real time as the physics that come with this effect are Fu**C*InG hard ! So we'll do (just like in all game and demo's) a fake lensflare. We'll take a look at these prerenderd ( PhotoPaint ) images of lensflares and try to figure out how they move and react.
As you can see, the starburst is at the spot where the bright light is. The centers of the holos (or "the other relections you can see" ) are always on the vector pointing from the center of the light to the center of the screen. Now this isn't to hard to create... But before we begin we must create the pictures that will form the flare. This can be done in a standard paint or raytrace program. Save them as tga files and convert them using the TEXUS program. If you aren't such a good artist, just download the full source. I have included 4 flares in 3df format.
Now this time I won't be showing all sourcecode in bits and pieces, instead I'll describe a good path to take in programming this effect. If you are really going to have big problems programming this, take a look at the full source. There you can find two routines called Render and RenderLensFlare which produce the flare.- First it maybe a good idea to write a procedure ( which I called Render ! ) which renders a simple square texture on screen, just 2d. It's arguments should be : X, Y, Colors R, B, G , Size and Distance ( in case you use a Z-buffer ). It should use the currently active texture for rendering so there is no need to worry about that.
- Now create a routine that renders the LensFlare. Its arguments can be the 3 or 4 flaretextures, the position of the light (2d !) and the center of the screen. At the beginning of the routine set the DepthBufferFunction ( ..._ALWAYS ! ), Colorcombine and the AlphaBlendFunction to the correct modes. Create a vertor with components x and y which point form the lightsource ( L ) to the center ( C ) of the screen, like this: Vx = Cx - Lx, LY = Cy - Ly.
- Now activate the starbursttexture and draw it using the "Render"-routine, at the center of the lightspot. Our light shines !
- Now for the finishing touch, create the holos... Just scale the created vertor (Vx and Vy) with a certain value, add it to the position of the light and draw a holo or another (smaller) starburst. Repeat this. Just experiment until you find something that looks cool ! I render 5 holo's and 3 starbursts. Look at the full sourcecode to see the scaling factors I used.
- Now all is left to do is reset the DepthBufferFunction, Colorcombine and the AlphaBlendFunction.
- And here we have our LensFlare! Well this next piece is going a bit more difficult than the lensflare. I'm going to discuss implanting a SIMPLE particle system.
Q:What is a particle system ?
A:It is a technique used for simulating complex visual effects like explosions, fire, water, smoke, etc..
Q:Go on !
A:It works by simulation individual particles. A particle can be dead or alive. The movement of every particle follows a set of rules. These rules are simple rules, like 'a part accelerates towards the ground'. Every particle is given a starting position, starting direction, speed, energy, acceleration, ect. Then let when follow the rules and you have your particle system.
Q:Mmmm,...sounds great but I don't understand a thing you're saying !
A:Let me show you.
This is what I did for creating a really cool explosion.
Take lets say 100 particles and let them all share the same starting point. Now give them a a random direction ( x, y, z ) and speed. Be sure to not take values that are to big ! We are dealing with high framerates ! This is all just setup work.
Now when it comes to animating the particles. If the particle is alive, just add DirectionX*Speed to PositionX, DirectionY to ....and DirectionZ to ... Multiply the Speed and Color by let us say 0.93 to scale them down. Now if the Speed of the particle comes below a certain threshold, kill it, else render it ( use the same render routine as you wrote for the lensflare ! ). Simply do this for all particle. To easy for you ? Try this: When an explosion is at its brightest the light should blind the viewer...Try fading the screen to white and back when a big explosion occurs.
Fire can be done in exactly the same way as an explosion. But when it comes to killing the particle, don't kill it but give it new values just as you did when setting up the particle system. Fires also don't need as many particles as an explosion to look convincing.
Smoke can be done in almost the same way as fire. Just use an other texture ( a more blurry one ) and make the particles move slower. Maybe you can take side effects like wind direction into account.
Notes:- Start making your particle system with just one effect in mind. Fire or an Explosion are among the easiest.
- First try making a 2d particle system, get it to work, make it look impressive, and then convert it into 3d ! This should eliminate a great deal of frustration.
- I use the starburst texture just like with the lensflare to make explosions and fires. It looks convincing and saves texturememory.
- There are two big drawbacks on particlesystems if you use alphablending. 1) Alfablending is slow. This isn't a problem is you are rendering a lensflare, but it does bug you when you want to create say 2 particlesystems, each which around 100 particle. 2) If you use alphablending the scene has to be sorted. The Z-buffer doesn't render alphablended triangles correct. Again this isn't a problem is you are making a lensflare as a lensflare is always on top of the scene, but fires can be hidden from view when an object passes in front of it. Well, of course there a bunch of you who for whom this is all far to simple...Certain Effects can follow each other. Try make a fire that slowly dies and starts smoking...Just let you fantasy go free!
A last minute note, to be able to compile the source you need the mozart.asc file from the first tutorial.
- Go to the C/C++ and add __MSC__ to the Preprocessor definitions.


