
This is a technique that is not used enough in real-time graphics applications. Digital Filtering produces dramatic special effects and can be used for many other uses - such as edge detection and adjusting sharpness/contrast. Credit is given to Modern Image Processing: Warping, Morphing, and Classical Techniques by Christopher Watkins, Alberto Sadun, and Stephen Marenka, for the research for this article.
Digital Filtering has many uses. It is often used for special effects, edge detection, and adjusting image sharpness or contrast. However, there is one major obstacle: it's slow. Even with optimizations in place, it may be too slow for use in real-time graphics applications, such as a game with a 3D engine. However, there are strategic methods that are used so that such a thing is possible. It is just very difficult to do.
However, the overall process of digital filtering is easy to understand, and it opens up many new ideas for real-time graphics programs. Eye-popping results can be made quite easily and in a very short amount of time. This is not exactly new information, for it has been around for years. However, it still produces dramatic special effects and can be used for many programs.
[hr]
The most famous (and easiest to program) form of digital filtering is convolution, also known as correlation. This technique uses weighting, which is defined as determining a pixel's color by comparing the colors of the neighboring pixels. This is very useful for edge detection, adjusting sharpness/contrast, or making a nice special effect.
Convolution kernels are a table that look something like this:
| 1 | 2 | 3 |
| 4 | 5 | 6 |
| 7 | 8 | 9 |
| 45 | ||
- Multiply <99,99> by 1 (the upper-left coefficient).
- Multiply <100,99> by 2 (the upper-mid coefficient).
- Multiply <101,99> by 3 (the upper-right coefficient).
- Multiply <99,100> by 4 (the mid-left coefficient).
- Multiply <100,100> by 5 (the original pixel - mid-mid coefficient).
- Multiply <101,100> by 6 (the mid-right coefficient).
- Multiply <99,101> by 7 (the lower-left coefficient).
- Multiply <100,101> by 8 (the lower-mid coefficient).
- Multiply <101,101> by 9 (the lower-right coefficient).
- Add all these multiplications up.
- Divide the result by 45 (the normalization constant).
- Repeat with every other pixel.
- You have digitally filtered it! That is the entire process of digital filtering. There is an alternate way to write the kernal. It can be expressed in this way as well:
However, for the purpose of this article, I shall keep the kernel as the original format for clarity's sake.1/45 2/45 3/45 4/45 5/45 6/45 7/45 8/45 9/45
This is a relatively simple process. However, there are some rules. It is important to note that these rules can (and sometimes must) be bent, but they provide a nice place to start.- The sum of the 3x3 square should be equal to the normalization constant. A nice rule, too bad it isn't always true. Sometimes some of the numbers in the 3x3 square will be negative, so it is possible (and sometimes necessary) to have a sum of zero. A computer can't divide by zero and get a real number. So, The sum of the 3x3 square should be equal to the normalization constant, unless the sum is zero, and if it is, the normalization constant is set to one.
- A negative result is thrown out and replaced with zero. This is just what I do - other methods include taking the absolute value of the result, using the original pixel, adding the negative number to 256 (assuming 256 is the maximum value, hence getting a value lower than 256), or other crazy stuff. So, A negative result is thrown out and replaced with zero unless you do something else. In most of the kernals I use, it is beneficial to throw out the negative values. I'll get to that later.
- Don't calculate the pixels that lie on the side of a pixel. This means that you don't calculate the pixels at the far left, far right, the highest pixels, or the lowest pixels. Why not? Well, they don't have pixels on one side of them (Think - the pixels at the top don't have neighboring pixels above them). There are ways to counter this, such as "wrapping around" the pixels - if you have an 800x600 image and call pixel 801x600, you use 1x600, by wrapping around and getting the pixel from the other side. For simplicity, I don't calculate the pixels on the side, though it may be beneficial to do so. So, Don't calculate the pixels that lie on the side of a pixel unless you can deal with it.
- Assume 3x3 kernels. OK, I almost never follow this in REAL convolution applications. Larger kernels provide less of an effect, and can be any shape (2x7, 7x4, 9x9, not limited to squares, but it must have a center - 2x2 and 4x6 would not work. Avoid even numbers at all costs). However, for clarity's sake, I'll at least Start out with 3x3 kernels.
There, that's not so bad. I've outlined the process, now let's get down and dirty into some source code! - Shift and Difference Edge Enhancement Filter
- Laplacian Edge Enhancement Filter
- Gradient Directional Edge Enhancement Filter
- Directional Edge Enhancement Filter
- Sobel's algorithm
- Prewitt's filters
[hr]
OK, I've outlined the process, now I'm gonna outline the source code, give you the source code, then explain it. Hang on to your hats (or mice, I guess)!
In my first attempt to use convolution, I used a single one-dimensional array called Filters (char) to store all the kernels I would ever use. The format of the array is simple:
| Offset | Description |
| 0-8 | The first 3x3 matrix |
| 9 | The first normalization constant |
| 10 | The second 3x3 matrix |
| 19 | The second normalization constant |
| ... | ... |
#define AVERAGE 0
 #define LP1 10
 #define LP2 20
 #define LP3 30
#define GAUSSIAN 40...The procedure that actually filters the image is deftly named Filter. It filters the picture stored in a Picture struct named Source, and stores the filtered image in a Picture struct named Dest. The pointer into Filters is given in the parameter Filt. Then the fun begins. Memory is allocated for the new picture in Dest. If this memory allocation fails, the procedure returns 1. I assumed a 256-color image (it's easier to program) for this version, but a palette is NOT assigned to Dest - it's exactly the same as Source anyway. The procedure then runs through every pixel in the source image to filter/copy to Dest. I say filter/copy because all pixels on the sides are just copied, while all the other pixels are filtered. In the filtering process, the sum of all the pixels is stored in the long variable named numb, and, if numb isn't zero, it is divided by the normalization constant. If numb is positive, it is copied to Dest, otherwise the pixel in Dest is set to zero. A return value of 0 signals that the filtering succeeded.
I mentioned use of a Picture struct. These are used to store the bitmaps in memory and are coded quite simply. Their structure is like this:
struct Picture {
 unsigned short x,y;
 unsigned char *picture;
 unsigned char *palette;
} Pict;The 8-bit filtering procedure can be found in FILTER.H.
Now I am going to explain FILTER.H section by section.
// Assumes standard and picture header files are already loadedImmediately following the above line lies the defines and definitions of Filters. Filters is defined in this fashion:
char Filters[] = {
 //
 *****CONVOLUTION/CORRELATION*****
 // ***LOW PASS FILTERS***
 // Average
 1, 1, 1,
 1, 1, 1,
 1, 1, 1,
 9,
 // LP1
 1, 1, 1,
 1, 2, 1,
 1, 1, 1,
 10,
 // LP2
 1, 1, 1,
 1, 4, 1,
 1, 1, 1,
 12,
...int Filter(Picture &Source,Picture &Dest,unsigned short Filt) {
if((Dest.picture=new unsigned char[Source.x*Source.y])==NULL)
return 1; // Error allocating memory for Dest picture
Dest.x=Source.x;
Dest.y=Source.y;
signed long numb;for(unsigned short x=0;x
numb=(long)((Source.picture[(y-1)*Source.x+(x-1)]*Filters[Filt]+
Source.picture[(y-1)*Source.x+(x)]*Filters[Filt+1]+
Source.picture[(y-1)*Source.x+(x+1)]*Filters[Filt+2]+
Source.picture[(y)*Source.x+(x-1)]*Filters[Filt+3]+
Source.picture[(y)*Source.x+(x)]*Filters[Filt+4]+
Source.picture[(y)*Source.x+(x+1)]*Filters[Filt+5]+
Source.picture[(y+1)*Source.x+(x-1)]*Filters[Filt+6]+
Source.picture[(y+1)*Source.x+(x)]*Filters[Filt+7]+
Source.picture[(y+1)*Source.x+(x+1)]*Filters[Filt+8]));
if(numb)
numb/=(long)Filters[Filt+9];
if(numb>0)
Dest.picture[y*Dest.x+x]=(unsigned char)numb;
else
Dest.picture[y*Dest.x+x]=0;
} else
Dest.picture[y*Dest.x+x]=Source.picture[y*Dest.x+x];
}
return 0; // No error
}[hr]
Ha ha! I'm laughing at myself! I just gave you fully operational code on HOW to filter, without explaining what any of the filters actually DO! Well, I'll get to that in a minute. First, I'll show off the special effects of this neat little file. FILTER1.CPP cycles through each of the filters, showing off what each filter does.
The code is pretty simple to the author (ME) but it can be confusing to the person who hates reading source code. The key to this entire file is this:
for(l=0;l<=370;l+=10) {
 if(Filter(P1,P2,l)==1) {
 k=6;
 break;
 }
 DrawPicture(0,0,P2);
 if(getch()=='x')
 break;
 delete [] P2.picture;
}[hr]
There are a number of a different types of kernels used in elementary digital filtering. All of the ones I will explain are already conveniently defined in FILTER.H. Note: I am human, despite all the evidence contrary to the fact. I am capable of mistakes. If the numbers in the following sections do not match the numbers in FILTER.H, it is very likely that either set or both of them are wrong. If you notice any mistakes, I apologize. There is a great amount of numbers that can easily be mixed up.
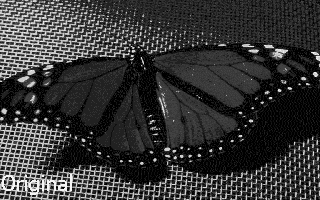
For reference's sake, here's the original bitmap that I will digitally filter:

[hr]
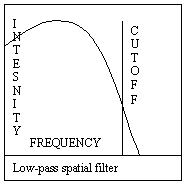
One of the simplest types of kernal is the low-pass spatial filter. These filters block out higher frequency pixel colors (pixels that aren't surrounded by pixels of similar color), and are used for reducing noise 1 to 2 pixels wide. Here's an example to make this more clear. Suppose you pass a low-pass spatial filter over an image where little changes. The pixels would be mostly unaffected (the lower frequency would pass through unaffected). However, let's say you pass a low-pass spatial filter over an image where there are huge changes in color that occur in small spots (there's noise). This image would be blurred and smoothed over. Images can be sharpened by subtracting and image that has been filtered with a low-pass filter from the original image. This is demonstrated in FILTLP1.CPP. Beware though, color subtraction in 256-color modes (or any mode) can make results you don't want. Here are the low-pass spatial filter kernels:
 Average |  LP1 |  LP2 |  LP3 |  Gaussian | |||||||||||||||||||||||||
| 1 | 1 | 1 | 1 | 1 | 1 | 1 | 1 | 1 | 1 | 1 | 1 | 1 | 2 | 1 | |||||||||||||||
| 1 | 1 | 1 | 1 | 2 | 1 | 1 | 4 | 1 | 1 | 12 | 1 | 2 | 4 | 2 | |||||||||||||||
| 1 | 1 | 1 | 1 | 1 | 1 | 1 | 1 | 1 | 1 | 1 | 1 | 1 | 2 | 1 | |||||||||||||||
| 9 | 0 | 10 | 10 | 12 | 20 | 20 | 30 | 16 | 40 | ||||||||||||||||||||
Here are the results from FILTLP1.CPP, which demonstrates color subtraction in order to produce a sharper image. The final result is indeed sharper than the original image, although the colors are skewed:
 [nbsp][nbsp]
 [nbsp][nbsp]
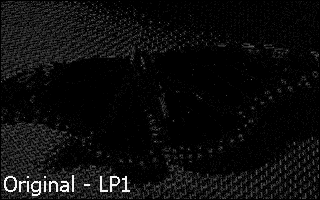
[hr]
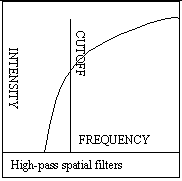
The high-pass spatial filter is used to amplify the higher-frequency aspects of an image. Higher-frequency parts of the image will become brighter, and lower-frequency parts will darken. This filter is used often to increase sharpness, but can increase noise.
High-pass spatial filters often have very large kernal centers, so that in images where there are many frequency changes, these changes are amplified and multiplied many times over. The negative coefficients are used to negate the large kernal centers. Therefore, areas of the image that have large intensity changes are intensified, while areas of the image that have little or no change are not intensified.
 Mean Removal |  HP1 |  HP2 |  HP3 | ||||||||||||||||||||
| -1 | -1 | -1 | 0 | -1 | 0 | 1 | -2 | 1 | 0 | -1 | 0 | ||||||||||||
| -1 | 9 | -1 | -1 | 5 | -1 | -2 | 5 | -2 | -1 | 20 | -1 | ||||||||||||
| -1 | -1 | -1 | 0 | -1 | 0 | 1 | -2 | 1 | 0 | -1 | 0 | ||||||||||||
| 1 | 50 | 1 | 60 | 1 | 70 | 16 | 80 | ||||||||||||||||
[hr]
Filters are not just made to enhance images, however. They also can be useful in edge enhancement or even edge detection. There are four edge enhancement algorithms:
[hr]
Shift and Difference Edge Enhancement Filters are pretty simple. These filters subtract a spatially shifted copy of the image from the original image. If you don't understand what that means, just try the filters out and you'll see their intended effect.
In subtracting the images, the filter measures the slope of the brightness - where the image goes from black to white. In areas where there is little change (slope around 0), the resulting pixel will be black. However, in areas with great black to white change (larger slope), the resulting pixel will brighten. This works as edge enhancement for areas of great black to white change (larger slope) are most likely the edge of an object in the image.
| Some Shift and Difference Edge Enhancement Filters | |||||||||||||||||
 Horizontal |  Vertical |  Horizontal/Vertical | |||||||||||||||
| 0 | -1 | 0 | 0 | 0 | 0 | -1 | 0 | 0 | |||||||||
| 0 | 1 | 0 | -1 | 1 | 0 | 0 | 1 | 0 | |||||||||
| 0 | 0 | 0 | 0 | 0 | 0 | 0 | 0 | 0 | |||||||||
| 1 | 90 | 1 | 100 | 1 | 110 | ||||||||||||
[hr]
The Laplacian Edge Enhancement Filter has the advantage of being omni-directional (it highlights edges from all directions). However, it has a great deal of math involved. If you don't understand the following, don't worry about it - just be glad it works.
Here's the math. The Laplacian of f(x,y) is defined as follows:
[font="Courier New"][color="#000080"] L[f(x,y)]=d[sup]2[/sup]f/dx[sup]2[/sup]+d[sup]2[/sup]f/dy[sup]2[/sup][/color][/font]
The larger variables are second partial derivatives with respect to x and y. We need to make this function discrete, so we need to approximate the second partial derivatives:
[font="Courier New"][color="#000080"] d[sup]2[/sup]f/dx[sup]2[/sup]=f(x+1)-2f(x)+f(x-1)
d[sup]2[/sup]f/dy[sup]2[/sup]=f(y+1)-2f(y)+f(y-1)[/color][/font]
That's actually quite nice - for now we can approximate the entire Laplacian in this way:
[font="Courier New"][color="#000080"] L[f(x,y)]=-4f(x,y)+f(x+1,y)+f(x-1,y)+f(x,y+1)+f(x,y-1)[/color][/font]
Look at that carefully. It looks an awful bit like a kernel. Don't see it? Well, this is how it translates:
| 0 | 1 | 0 | ? | 0 | -1 | 0 |
| 1 | -4 | 1 | -1 | 4 | -1 | |
| 0 | 1 | 0 | 0 | -1 | 0 | |
| -1 | 1 | |||||
Here is the accepted "actual" Laplacian kernals used in digital filtering:
 LAPL1 |  LAPL2 |  LAPL3 |  Diagonal |  Horizontal |  Vertical | ||||||||||||||||||||||||||||||
| 0 | -1 | 0 | -1 | -1 | -1 | 1 | -2 | 1 | -1 | 0 | -1 | 0 | -1 | 0 | 0 | 0 | 0 | ||||||||||||||||||
| -1 | 4 | -1 | -1 | 8 | -1 | -2 | 4 | -2 | 0 | 4 | 0 | 0 | 2 | 0 | -1 | 2 | -1 | ||||||||||||||||||
| 0 | -1 | 0 | -1 | -1 | -1 | 1 | -2 | 1 | -1 | 0 | -1 | 0 | -1 | 0 | 0 | 0 | 0 | ||||||||||||||||||
| 1 | 120 | 1 | 130 | 1 | 140 | 1 | 150 | 1 | 160 | 1 | 170 | ||||||||||||||||||||||||
[hr]
The Gradient Directional Edge Enhancement filter is used to highlight certain details in an image. A highlighted new pixel is made with positive slopes. The intensity of the new pixel is directly proportional to the pixel-by-pixel slope that the kernal experiences. Here they are:

East

South East

South

South West -1 1 1 -1 -1 1 -1 -1 -1 1 -1 -1 -1 -2 1 -1 -2 1 1 -2 1 1 -2 -1 -1 1 1 1 1 1 1 1 1 1 1 1 1 180 1 190 1 200 1 210

West

North West

North

North East 1 1 -1 1 1 1 1 1 1 1 1 1 1 -2 -1 1 -2 -1 1 -2 1 -1 -2 1 1 1 -1 1 -1 -1 -1 -1 -1 -1 -1 1 1 220 1 230 1 240 1 250 The Directional Edge Enhancement Filter for Embossing Effects, or "The Embossing Filter," is used to emboss an image and special effects:

East

South East

South

South West -1 0 1 -1 -1 0 -1 -1 -1 0 -1 -1 -1 1 1 -1 1 1 0 1 0 1 1 -1 -1 0 1 0 1 1 1 1 1 1 1 0 1 260 1 270 1 280 1 290

West

North West

North

North East 1 0 -1 1 1 0 1 1 1 0 1 1 1 1 -1 1 1 -1 0 1 0 -1 1 1 1 0 -1 0 -1 -1 -1 -1 -1 -1 -1 0 1 300 1 310 1 320 1 330 Now we're getting into Edge Detection and Contour Filters. Edge detection filters (NOT edge enhancement filters) are commonly referred to as contour filters, because of the output they produce. In real life applications, these filters are used to count blood cells in lab pictures, identify fossils, and as contour maps in geographical applications.
A contour filter uses the principle of gradients (how pixel intensities change from pixel to pixel). In effect, we are taking derivatives of an image. The gradient will be noticed more in parts of the image where there are contrasts in pxiel intensities (edges). For our purposes, I'll stick to one-dimensional gradient filters (this is elementary digital filtering, not filtering-that-takes-1,000-pages-to-explain).
Note that when using this filter, you need to pass the image through the horizontal filter, then use the original image and pass it through the vertical filter. Then there is a little math. I'll talk about two contour filters: Sobel and Prewitt.
Sobel Prewitt

Horizontal

Vertical

Horizontal

Vertical 1 2 1 1 0 -1 -1 -1 -1 1 0 -1 0 0 0 2 0 -2 0 0 0 1 0 -1 -1 -2 -1 1 0 -1 1 1 1 1 0 -1 1 340 1 350 1 360 1 370 OK, let's say you run your image through the horizontal. We'll call that image I[1]. Now run your original image through the vertical. That image is I[2]. In effect, you have:
I[1]=IMAGE*Sobel[Horizontal] and I[2]=IMAGE*Sobel[Vertical] Now you have to calculate:
I'=sqrt(I[1]*I[1]+I[2]*I[2]); And you're done! So, after you run the image through horizontal and vertical, you take the square root of the sum of the square of the two images. Confused? Check out SOBEL1.CPP and PREWITT1.CPP. They demonstrate this. Here is the output from each:
SOBEL


 PREWITT


 Alright, I have explained all the normal kernals. Now for some tips and tricks. Here's one: most of the kernals that we've gone through can be rotated. For example - take the sobel horizontal from above and rotate it 45 degrees. The table on the left is the original sobel, the table on the right is the rotated sobel:
Sobel Horizontal Original
? Sobel Horizontal Rotated 1 2 1 2 1 0 0 0 0 1 0 -1 -1 -2 -1 0 -1 -2 1 1 Another neat trick is to modify the kernal size. Usually if you want less of an effect, you use a larger kernal. However, there are better uses. In edge enhancement (gradient filters especially), you can actually identify lines and other neat stuff. With a kernal size of 3x3, it is hard to identify lines, for things that aren't supposed to be highlighted are. However, if you extend the kernal into a larger size, it is easier to identify objects - at the cost of more processing time. Here's an example of how to detect a horizontal line:
1 1 1 1 1 1 1 0 0 0 0 0 0 0 -1 -1 -1 -1 -1 -1 -1 1 In fact, it is indeed possible to construct templates which can detect a specific shape in an image. These templates are very large kernals and contain characteristics of the object. The above filter that detects horizontal lines is shown in HORIZ1.CPP. The first screen is the original image, the second is when you pass it through a 3x3 filter, the third is when you pass it through a 7x3 filter, exactly like above. Here is the difference this makes:


 More advanced digital filtering techniques involve statistical (nonlinear) convolution and using cross convolution, but the above filters should keep you busy for quite a while. Now I'll focus on a "true" filter procedure and optimization.
Take a look at NEAT1.CPP. This was my earliest attempt from many years ago to create a graphics primitive library. None of the shape-drawing routines are optimized at all, but it is fast enough for our purposes. Now, the program is key-sensitive: press 'b' and the program will draw its neat little shapes. Press 'a', and the program will first pass the image through a filter, then draw the filtered image. Press 'x' and the program will terminate. So, what I've tried to do is implement a filter through an animation in real-time. It uses FILTER.H from above. It has two main problems. The first is obvious: it's SLOW. This is a major obstacle, for we're talking game programming here: every nanosecond counts! I'll tackle this problem last, since the next problem will require a major rewrite of FILTER.H.
The second problem is that FILTER.H uses 8-bit terminology. It assumes the palette is correctly set for digital filtering. This means that if you blur color 50 of an image to color 49, 49 should look pretty close to 50, but not be 50. However, this is 8-bit: every color definition can be extremely different. If you want to blur color 50, and you end up with color 49, and color 49 looks nothing like color 50, you have a problem. There are a number of ways to solve this problem. One is to arrange your palette so that colors 1-10 are similar, colors 11-20 are similar, etc. However, this is impractical and timecomsuming. Let's rip up FILTER.H's 8-bit filtering system and make it 24-bit, where every color is not defined by a palette, but by the color itself.
OK, we're gonna make a 24-bit FILTER.H. What does that mean? Well, in a 24-bit color mode, every color is defined by 24-bits, making a possible 16.7 million colors. Yet you don't use a palette with 16.7 million colors in it to draw pictures on the screen. The bits in the 24-bit number describe what the color looks like - you don't need a palette. Essentially, it can be divided into 3 byte (8-bit) color attributes: red, green, and blue. Mixing and matching different amounts of these color attributes will make any color in the visible color spectrum. The 24-bit version is called FILTER2.H, and you can download it