The purpose of this article is to describe a way to simulate game physics in two dimensions. We will use an approach known as Verlet integration, go over the basics of moving points and building shapes to topics like collision detection and response. The reader should know the basics of vector maths, meaning addition, subtraction, multiplication with a scalar and the dot product. More than that is not required, however, for deeper understanding more knowledge of Euclidean geometry in two dimensions wouldn't hurt.
[size="5"]Verlet integration
First of all, what is Verlet integration? The Verlet integration is a way of numerically integrating the equations of motion. For this article, you really don't have to know what numerical integration means; basically, the Verlet integration describes the movement of a point trough time. There are different methods to do that - I guess, most of you know the Euler method:

If we merge these two equations into one, meaning we substitute the Velocity[sub]New[/sub] in the second equation by the right hand side of the first equation, we get:
There are different types of Verlet integration methods - Position Verlet, Velocity Verlet and Leapfrog. For this article, we will choose the position version, because it has some nice features that we're going to take advantage of.
The corresponding equation for position Verlet is actually not much different from the one shown above:

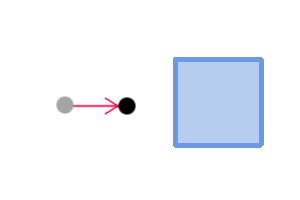
As we can see now, the term (Position[sub]Current[/sub] - Position[sub]Old[/sub]) in the Verlet equation replaces the velocity if we compare it with the Euler approach. Consequently, this means that this approach doesn't deal with velocities at all - one thing less to worry about. This integration method is not always quite accurate, since (Position[sub]Current[/sub] - Position[sub]Old[/sub]) is only an approximation of the actual velocity. However, it's fast and stable, which is why it is well suited for games. Also, using this approach the collision response gets really simple. Let us consider a point as shown in figure 1.
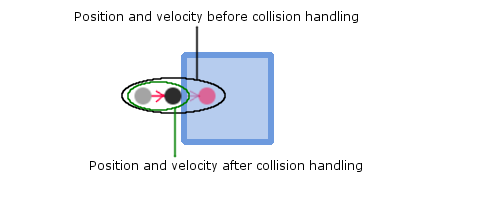
The starting conditions for Position[sub]Old[/sub] and Position[sub]Current[/sub] are chosen such that the point moves slowly to the right. After a certain amount of time steps, the point will intersect with the square on the right. Once the collision is detected, we only have to move the point out of the square and we are done with the collision response. Since the integration uses (Position[sub]Current[/sub] - Position[sub]Old[/sub]) as its velocity, the speed of the point will subsequently change if we change either CurrentPosition or OldPosition - which is what we did in the collision response (we moved the point out of the square). As we can see in figure 2, the point will automatically decelerate and eventually stop.
If we put the formula above in code, we get something like this (assuming you have a working vector-class, that is):
struct Point {
 Vec2 Position;
 Vec2 OldPosition;
 Vec2 Acceleration;
 };

 class Physics {
 int PointCount;
 Point* Points[ MAX_VERTICES ];

 float Timestep;

 public:
 void UpdateVerlet();

 //Constructors, getters/setters etc. omitted
 };

 void Physics::UpdateVerlet() {
 for( int I = 0; I < PointCount; I++ ) {
 Point& P = *Points[ I ];

 Vec2 Temp = P.Position;
 P.Position += P.Position - P.OldPosition + P.Acceleration*Timestep*Timestep;
 P.OldPosition = Temp;
 }
 }
Now we have a working physics code that will calculate the trajectories of arbitrary points just fine. But points alone are not very useful, except when you're programming a particle simulation. Since that's normally not the case if you're into game programming, we have to extend the points in some way so we can simulate rigid body behaviour as well. If we look at rigid bodies in nature, we see that they are actually a huge amount of points (=atoms) held together by various forces. We could of course try and create thousands of particles and connect them in some way to approximate the behaviour of rigid bodies, which would work indeed. However, that would cause a huge amount of calculations to be done for e.g. a single cube, let alone a whole game filled with physics bodies, so this isn't really an optimal solution. Luckily, it shows to be sufficient only to model the vertices of a body. If we were to simulate a box, we would simply create the four vertices that make up the shape of a box, connect them somehow and we're done.
The problem left to compute is now only that of the connections. If we again imagine a box and the four vertices, it should become clear that the distance of a vertex to another should always remain constant. If the distance between two vertices changes, this always means that the shape of the body gets deformed, and we don't want that - who would like to have a crate in his game that collapses once you stand on it? Therefore, we have to find a way to keep the distance between two vertices at a constant value.
If we had the same problem in reality, the solution would be simple - just insert some kind of pole in-between and the vertices won't approach each other anymore. We will do the exact same thing in our program; create a new class that represents an 'imaginary pole'. It connects two vertices and keeps those vertices at a constant distance. The algorithm to update these 'poles' is called once the Verlet is calculated. The algorithm itself is actually quite simple. First of all, we have to calculate the vector between the two vertices that are connected by the pole. The current distance between the two vertices is simply the length of that vector. Once we have the current length, the difference of the original length of the pole should be calculated. We can now use the difference to push the vertices to a position where the distance constraint is satisfied.
struct Edge {
 Vertex* V1;
 Vertex* V2;

 float OriginalLength; //The length of the edge when it was created

 //Constructors etc. omitted
 };

 void Physics::UpdateEdges() {
 for( int I = 0; I < EdgeCount; I++ ) {
 Edge& E = *Edges[ I ];

 //Calculate the vector mentioned above
 Vec2 V1V2 = E.V2->Position - E.V1->Position;

 //Calculate the current distance
 float V1V2Length = V1V2.Length();

 //Calculate the difference from the original length
 float Diff = V1V2Length - E.OriginalLength;

 V1V2.Normalize();

 //Push both vertices apart by half of the difference respectively
 //so the distance between them equals the original length
 E.V1->Position += V1V2*Diff*0.5f;
 E.V2->Position -= V1V2*Diff*0.5f;
 }
 }
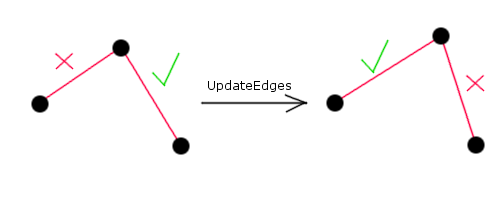
That's it - if we created a few points and connected them with our newly created edge struct, the resulting body would show very nice rigid body-behaviour, including rotational effects when it hits the floor. But why does that work? The code isn't much different from before, we only added a few lines to satisfy the distance constraint and suddenly we have rigid bodies. The reason behind this lies within our integration method. If we recall that the Verlet integration doesn't work with velocity but rather with the difference between the current position and the position before the last integration step, it should become clear that the speed of the point will change if we change its position. Therefore, since we change its position in the UpdateEdges method, its velocity will also change. The overall change in velocity looks exactly like we would expect it from a vertex of a rigid body; it is not totally correct, but good enough for games.To be honest, I lied when I said before that the code would work just fine if we executed it like that. As the code is now, bodies would not be totally rigid. If a body collides with the floor, the distance between it's vertices is not totally constant, which means that the body is more or less deformed, depending on the it's speed before the collision. Why does that happen? The UpdateEdges method is totally correct, but still the distance between two vertices may vary. If we look at figure 3, this should become clear: If a vertex is connected to more than just one edge (which is normally the case), the length correction of one edge may disturb the length of another edge, which is why the bodies get deformed.
The only way to get rid of this problem is to execute the edge correction method more than just once per frame. The more this method is called, the more perfect the situation gets approximated, where all vertices have the right distance to each other. This gives game programmers a scalable physics algorithm - the more time is left at the end of the main loop, the more iterations can be used for the distance correction (and the collision response that will be introduced later). Vice-versa, if the main loop takes more time to execute, the iterations used for physics can be reduced so the game runs at a more or less constant frame rate.
[size="5"]Collision Detection
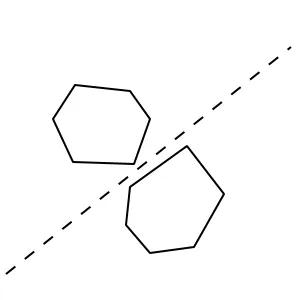
Now that our algorithm supports the simulation of (almost) rigid bodies, let's proceed to the next problem - collision detection! In this article, we will use an algorithm known as the 'Separating Axis Theorem'. If you already now how it works, you might as well just skip this part and go straight to the collision response. So, how does the Separating Axis Theorem work? As the title suggests, it states that two bodies don't collide, as long we are able to put a straight line between the two, that doesn't intersect either body. Figure 4 demonstrates this.
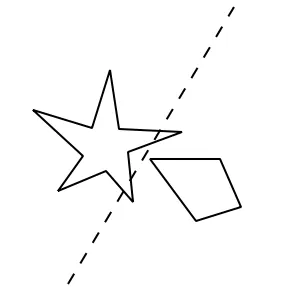
The only limitation of this algorithm is that it only works correctly with convex shapes. If we tested two concave shapes, the algorithm will fail, meaning that it would detect a collision when there is none. The reason should become evident if you take a look at figure 5.
We could deal with that by breaking up each concave polygon into convex subshapes and then test each subshape separately, but for simplicity reasons, we will just stick to convex polygons in this article - feel free to add concave support later.
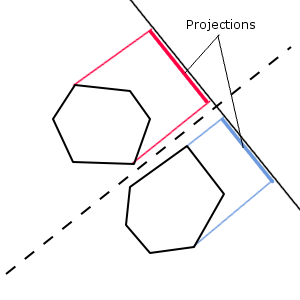
So, how do we find out whether we could put a line in-between? We could of course just test every possible line for intersection, but it is evident that this is completely inefficient. To do this, we will take advantage of projection. If we put a new line in figure 4 that is perpendicular to the separating line, we can see that the projections of the two bodies on this line do not overlap (as shown in figure 6). However, if we chose a line that does intersect, the projections of the two bodies do also overlap.
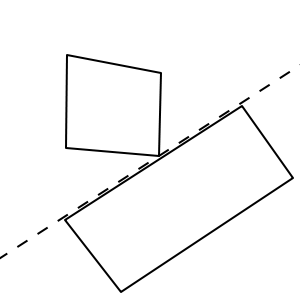
It is irrelevant where we place the line that we project to, since the resulting projection is one-dimensional anyway - only its direction is important. This means that we don't have to look for a line that fits perfectly in-between the two bodies anymore, but for a direction where the projections don't overlap. Finding this direction shows to be quite easy. Let's consider the case where there is only one possible line that separates the two bodies (see figure 7).
It is evident that this line is parallel to the left edge of the right body. Therefore, to find the direction of a separating line, we simply have to iterate over all edges of both bodies and check, if the projection of the bodies onto the perpendicular of the edge overlap. If they don't, the bodies don't collide and we can end the search. If they do, we go on to the next edge. If there is no such edge, the entities are colliding and we have to proceed with the collision response.
Let's put this into code! But before we can implement the collision detection, we first have to write a body class that contains its respective vertices and edges:
struct PhysicsBody {
 int VertexCount;
 int EdgeCount;

 Vertex* Vertices[ MAX_BODY_VERTICES ];
 Edge* Edges [ MAX_BODY_EDGES ];

 void ProjectToAxis( Vec2& Axis, float& Min, float& Max );

 //Again, constructors etc. omitted
 };
The ProjectToAxis method will project the body onto the passed axis and change the Min and Max variables to the result of the projection. Since a projection of a 2D-shape onto 1D results in a mere interval of a line, the result of the projection can be stored in two floats that denote the beginning and the end of the interval. The projection method is quite simple: void PhysicsBody::ProjectToAxis( Vec2& Axis, float& Min, float& Max ) {
float DotP = Axis*Vertices[ 0 ]->Position;
//Set the minimum and maximum values to the projection of the first vertex
Min = Max = DotP;
for( int I = 1; I < VertexCount; I++ ) {
//Project the rest of the vertices onto the axis and extend
//the interval to the left/right if necessary
DotP = Axis*Vertices[ I ]->Position;
Min = MIN( DotP, Min );
Max = MAX( DotP, Max );
}
} As you can see, projection in 2D is simply a dot product of the projection axis and the point we want to project. The collision detection may look like this:bool Physics::DetectCollision( PhysicsBody* B1, PhysicsBody* B2 ) {
//Just a fancy way of iterating through all of the edges of both bodies at once
for( int I = 0; I < B1->EdgeCount + B2->EdgeCount; I++ ) {
Edge* E;
if( I < B1->EdgeCount )
E = B1->Edges[ I ];
else
E = B2->Edges[ I - B1->EdgeCount ];
//Calculate the axis perpendicular to this edge and normalize it
Vec2 Axis( E->V1->Position.Y - E->V2->Position.Y, E->V2->Position.X - E->V1->Position.X );
Axis.Normalize();
float MinA, MinB, MaxA, MaxB; //Project both bodies onto the perpendicular axis
B1->ProjectToAxis( Axis, MinA, MaxA );
B2->ProjectToAxis( Axis, MinB, MaxB );
//Calculate the distance between the two intervals - see below
float Distance = IntervalDistance( MinA, MaxA, MinB, MaxB );
if( Distance > 0.0f ) //If the intervals don't overlap, return, since there is no collision
return false;
}
return true; //There is no separating axis. Report a collision!
}The algorithm works just like described above; if something isn't clear, I would suggest rereading the explanations step by step. The IntervalDistance method that is mentioned in the code is actually quite simple:float Physics::IntervalDistance( float MinA, float MaxA, float MinB, float MaxB ) {
if( MinA < MinB )
return MinB - MaxA;
else
return MinA - MaxB;
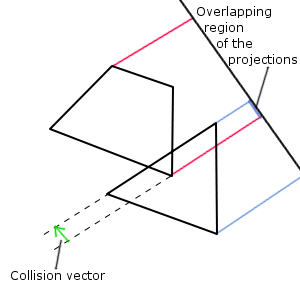
}Since we don't know if body A will lie on the left and body B on the right or vice-versa, we have to check which interval begins sooner. We then subtract the end of the left interval from the beginning of the right interval to get the distance between the two - if this value is smaller than zero, they overlap. That's it for collision detection! ...well, not yet. Apart from detecting whether or not the two bodies collide, the collision detection should also provide certain information about the collision. We also have to calculate a so-called collision vector that is big enough to push the two bodies apart so they don't collide anymore, but touch each other. There are of course arbitrarily much vectors that could accomplish this, but for our physics to look right we have to find the smallest of those vectors. The vector we're looking for has the pleasant property that it's always parallel to one of the lines we projected to, which means that we only have to check each edge and calculate the length of the vector needed to push the two bodies apart. Figuring out the length isn't really a hard thing to do, if we take a look at figure 8.
In the code above we projected both bodies onto the axis given by the (normalized!) vector 'Axis'. We then called the method IntervalDistance to check whether or not the intervals are overlapping. The length of the vector (which is parallel to the axis we projected to) needed to push the two bodies apart is simply the amount of overlapping. To allow the information calculated in the DetectCollision method to pass smoothly to the collision response, we add a new struct to our Physics class:
class Physics {
 struct {
 float Depth;
 Vec2 Normal;
 } CollisionInfo;

 //Everything else omitted
 }
The 'Depth' is the length of the vector, the 'Normal' is the direction of the vector discussed above. Our new DetectCollision method would now look like this:
bool Physics::DetectCollision( PhysicsBody* B1, PhysicsBody* B2 ) {
 float MinLength = 10000.0f; //Initialize the length of the collision vector to a relatively large value
 for( int I = 0; I < B1->EdgeCount + B2->EdgeCount; I++ ) {
 Edge* E;

 if( I < B1->EdgeCount )
 E = B1->Edges[ I ];
 else
 E = B2->Edges[ I - B1->EdgeCount ];

 Vec2 Axis( E->V1->Position.Y - E->V2->Position.Y, E->V2->Position.X - E->V1->Position.X );
 Axis.Normalize();

 float MinA, MinB, MaxA, MaxB;
 B1->ProjectToAxis( Axis, MinA, MaxA );
 B2->ProjectToAxis( Axis, MinB, MaxB );

 float Distance = IntervalDistance( MinA, MaxA, MinB, MaxB );

 if( Distance > 0.0f )
 return false;

 //If the intervals overlap, check, whether the vector length on this
 //edge is smaller than the smallest length that has been reported so far
 else if( abs( Distance ) < MinDistance ) {
 MinDistance = abs( Distance );

 CollisionInfo.Normal = Axis; //Save collision information for later
 }
 }

 CollisionInfo.Depth = MinDistance;

 return true; //There is no separating axis. Report a collision!
 }
Once we have this, we'd be already able to write a very simple collision response. Since the collision vector we calculated pushes the two bodies apart so they don't collide anymore, we could just move all vertices of both bodies back by half the vector and we'd be done. This would work, since interpenetrations are resolved, but it wouldn't look right. The bodies would simply glide off each other, meaning they don't start to spin like a real object when hit. The problem is that a body in our approach only spins if the velocities of its vertices differ. In the same manner, a body only changes its rotational velocity if its vertices experience different acceleration. Acceleration is change in velocity, and in Verlet integration change in velocity is equal to change in position. Therefore, if we move the two bodies back by the collision vector, we change the velocity of all vertices of both bodies by the same amount, which means that there is no change in the rotational velocity. For this reason, we need to write a better collision response.
This is where the advantage of our approach kicks in! In a rigid body system, we would have to use complicated formulas to calculate the momentum and then treat the linear and angular case separately. In our system, the whole thing is much easier - we just have to move the edge and the vertex participating in the collision backwards so they don't intersect, but touch each other. Since both the edge and the vertex are connected to the rest of their respective body, the position (and therefore the velocity) of the other vertices will change immediately to fulfil the length constraint. Both bodies will start spinning self-actingly. The whole collision response reduces to identifying the edge and the vertex that participate in the collision and separating them from each other; everything else will be done automatically by the edge correction step.
Identifying the collision edge and vertex is not that hard. The collision vertex is the vertex that lies closest to the other body. Therefore, we simply have to create a line whose normal vector is the collision normal (its starting point doesn't really matter). We then measure the distance of each vertex of the first body from the line using the line equation in vector geometry, which is
where N is the normal vector, R[sub]0[/sub] the origin of the line, R the point to be tested and d the distance of the point from the line. The set of all points that form a line are given by d = 0 (all points that have zero distance from the line), just as a side note. Once we have the distance of each vertex from the line, we choose the one with the lowest distance - that's the collision vertex we were looking for. Please note that d can also be negative. A line separates a two dimensional space in two halves; if the point R lies in the half the line normal points into, the distance will be positive, but if it lies on the other side, the distance will be negative. Therefore, it is important in which direction the collision normal points (in the implementation presented below, it's always made sure that the collision normal points at the body containing the collision vertex).
The collision edge is even easier to find. Remember when we projected the bodies on the perpendicular of an edge to find the smallest collision vector? The collision edge is simply the edge that resulted in the smallest vector.
Time to put this in code! First of all, we have to extend the collision info struct in the physics class to contain the collision edge and vertex:
struct {
 float Depth;
 Vec2 Normal;

 Edge* E;
 Vertex* V;
 } CollisionInfo;
Now we can rewrite our DetectCollision method to detect the additional information: bool Physics::DetectCollision( PhysicsBody* B1, PhysicsBody* B2 ) {
float MinDistance = 10000.0f;
for( int I = 0; I < B1->EdgeCount + B2->EdgeCount; I++ ) { //Same old
Edge* E;
if( I < B1->EdgeCount )
E = B1->Edges[ I ];
else
E = B2->Edges[ I - B1->EdgeCount ];
Vec2 Axis( E->V1->Position.Y - E->V2->Position.Y, E->V2->Position.X - E->V1->Position.X );
Axis.Normalize();
float MinA, MinB, MaxA, MaxB;
B1->ProjectToAxis( Axis, MinA, MaxA );
B2->ProjectToAxis( Axis, MinB, MaxB );
float Distance = IntervalDistance( MinA, MaxA, MinB, MaxB );
if( Distance > 0.0f )
return false;
else if( abs( Distance ) < MinDistance ) {
MinDistance = abs( Distance );
CollisionInfo.Normal = Axis;
CollisionInfo.E = E; //Store the edge, as it is the collision edge
}
}
CollisionInfo.Depth = MinDistance;
//Ensure that the body containing the collision edge lies in
//B2 and the one containing the collision vertex in B1
if( CollisionInfo.E->Parent != B2 ) {
PhysicsBody* Temp = B2;
B2 = B1;
B1 = Temp;
}
//This is needed to make sure that the collision normal is pointing at B1
int Sign = SGN( CollisionInfo.Normal*( B1->Center - B2->Center ) );
//Remember that the line equation is N*( R - R0 ). We choose B2->Center
//as R0; the normal N is given by the collision normal
if( Sign != 1 )
CollisionInfo.Normal = -CollisionInfo.Normal; //Revert the collision normal if it points away from B1
float SmallestD = 10000.0f; //Initialize the smallest distance to a high value
for( int I = 0; I < B1->VertexCount; I++ ) {
//Measure the distance of the vertex from the line using the line equation
float Distance = CollisionInfo.Normal*( B1->Vertices[ I ]->Position - B2->Center );
//If the measured distance is smaller than the smallest distance reported
//so far, set the smallest distance and the collision vertex
if( Distance < SmallestD ) {
SmallestD = Distance;
CollisionInfo.V = B1->Vertices[ I ];
}
}
return true;
}In the above code, we introduced a new variable in the PhysicsBody struct, the center. It will be recalculated before the collision step and is simply the average of all vertices of the body. [size="5"]Collision Response
Finally, we're done with collision detection. The only thing left to do is the collision response, which is luckily not that hard. As explained above, we just have to push the collision vertex and the collision edge apart by the collision vector and we're done. This is trivial for the collision vertex. Since we already ensured that the collision normal points at the first body which contains the collision vertex, we just have to add half of the collision vector to the position of the vertex:
void Physics::ProcessCollision() {
 Vec2 CollisionVector = CollisionInfo.Normal*CollisionInfo.Depth;

 CollisionInfo.V->Position += CollisionVector*0.5f;
 }
For the edge case, this will become a bit more complicated. The edge consists of two vertices that will move differently, depending on where the collision vertex lies. The closer it lies to the one end of the edge, the more this end will move and vice-versa. This means that we first have to calculate where on the edge the collision vertex lies. This is done using the following equation: 
Where V is the position of the collision vertex and E[sub]1[/sub] and E[sub]2[/sub] are the two vertices connected by the edge. t is the factor that determines where on the edge the vertex lies, reaching from 0 to 1. It doesn't matter whether we choose the X or the Y coordinate to calculate t, since both would result in the same value. The X case would look like this:
Vertex* E1 = CollisionInfo.E->V1;
 Vertex* E2 = CollisionInfo.E->V2;

 float T = ( CollisionInfo.V->Position.X - CollisionVector.X - E1->Position.X )/( E2->Position.X - E1->Position.X );
But be careful! If E2 lies directly above E1, the program would divide by zero. Therefore, we should build in a small check to avoid this: float T;
if( abs( E1->Position.X - E2->Position.X ) > abs( E1->Position.Y - E2->Position.Y ) )
T = ( CollisionInfo.V->Position.X - CollisionVector.X - E1->Position.X )/( E2->Position.X - E1->Position.X );
else
T = ( CollisionInfo.V->Position.Y - CollisionVector.Y - E1->Position.Y )/( E2->Position.Y - E1->Position.Y );This basically divides by the X denominator if it is bigger than the Y denominator and vice-versa. We then use the following neat formula to calculate a scaling factor that ensures that the collision vertex lies on the collision edge after the collision response. We could derive it by solving a few equations, but I don't think the derivation is really important, so I'll just leave this here:

Once we put all of this in code, we get:
void Physics::ProcessCollision() {
 Vec2 CollisionVector = CollisionInfo.Normal*CollisionInfo.Depth;

 Vertex* E1 = CollisionInfo.E->V1;
 Vertex* E2 = CollisionInfo.E->V2;

 float T;
 if( abs( E1->Position.X - E2->Position.X ) > abs( E1->Position.Y - E2->Position.Y ) )
 T = ( CollisionInfo.V->Position.X - CollisionVector.X - E1->Position.X )/( E2->Position.X - E1->Position.X);
 else
 T = ( CollisionInfo.V->Position.Y - CollisionVector.Y - E1->Position.Y )/( E2->Position.Y - E1->Position.Y);

 float Lambda = 1.0f/( T*T + ( 1 - T )*( 1 - T ) );

 E1->Position -= CollisionVector*( 1 - T )*0.5f*Lambda;
 E2->Position -= CollisionVector* T *0.5f*Lambda;

 CollisionInfo.V->Position += CollisionVector*0.5f;
 }
That's it. We're done with collision response - easy, wasn't it? All that's left to do is to put all of the methods we wrote into a single update method:
void Physics::Update() {
 UpdateForces();
 UpdateVerlet();
 IterateCollisions();
 }
IterateCollisions is a method that does multiple things. It iterates over all bodies, calls the respective UpdateEdges method, recalculates the body center and then does the collision detection (and the collision response, if necessary). Of course, it doesn't just do this once, but repeats those steps a few times. The more repetitions are made, the more realistic the physics will look. The reason was explained above (if you've forgotten, better read it again ;) ). [size="5"]Final Words
You can download a working implementation using GLUT and OGL as a Visual C++ 2008 project via the attached resource file. It is basically the same code as discussed in this article with a few optimizations and a very simple rendering and input function. I hope you enjoyed this article and found it useful. If you have any questions or suggestions, please let me know. Since I'm not a native English speaker, there might be a few mistakes here and there; please bear with it.




Since a long time I'm searching how to develop a physic engine like Angry Birds. I think this algorithm is a good way to do that.
Moreover, I'm sure this approach could be used for a 3D game physic.