Background
Tweening (short for in-betweening) is an animation term for the process of generating intermediate frames between two keyframes in order to make an animation appear smooth. In traditional animation (think The Simpsons) a production's animators will draw the main frames of a scene, and then send just these keyframes to an off-site production company (somewhere in Asia), where low-paid animators do the grunt work of generating in-between frames so that the animation will be smooth.
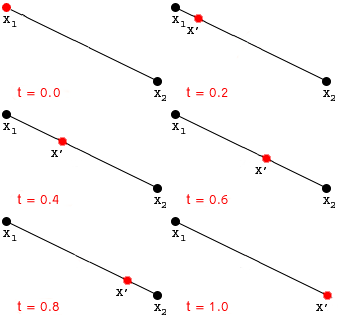
For vector graphics (such as a 3d model), the grunt work of generating the in-between frames can be done mathematically. The easiest and fastest technique is called linear interpolation. Linear interpolation is represented by one simple equation:
X? = X[sub]1[/sub] + t x (X[sub]2[/sub] - X[sub]1[/sub])
Plugging in the starting position vertex for X[sub]1[/sub], the ending position vertex for X[sub]2[/sub], and a time factor (the percent to interpolate between the vertices), X? will give us the location of the intermediate vertex:

Fortunately, DirectX 8-9 implements this for us, and I am going to show you how to use it with DirectX 9 to make your own animations. But first, I'm going to show you another cool feature of DirectX that will help us to implement tweening. By the way, for the purposes of this article I will assume that you have basic knowledge of creating and using vertex buffers- so if you don't know about VB's, read the SDK documentation or check out some of the awesome articles on gamedev.
Vertex Declarations
Vertex Declarations were introduced in DirectX 8 as a powerful alternative to the Flexible Vertex Format (FVF). Vertex declarations are the epitome of vertex-defining flexibility, and make it dead-simple to add features such as multi-texturing and (surprise, surprise) vertex tweening. If you've ever worked with vertex shaders, you probably already know about vertex declarations.

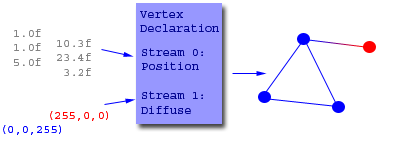
In case you don't know or understand how a vertex declaration works, I will briefly explain it here. When you render primitives in DirectX, you input a buffer of vertex data, which is simply a long list of 1's and 0's. DirectX does not, by default, know how this buffer should be interpreted to form the vertices that make up your space marine or "hello, world" multi-colored cube. The vertex declaration is a map that you provide to DirectX so that it can interpret the data from a byte stream into usable vertex data.
In DirectX 9, vertex declarations are "declared" as an array of D3DVERTEXELEMENT9 structures. The fields of the structure are fairly easy to understand and fill out once you understand what they do. Here is the structure:
typedef struct _D3DVERTEXELEMENT9 { BYTE Stream; BYTE Offset; BYTE Type; BYTE Method; BYTE Usage; BYTE UsageIndex; } D3DVERTEXELEMENT9; Stream Vertex stream number that this element comes from Offset The offset in bytes from the beginning of the stream to this element Type The data type this element's data represents
- D3DDECLTYPE_FLOAT3 - 3 floats (x, y, z positional data)
- D3DDECLTYPE_FLOAT2 - 2 floats (texture coordinates)
- D3DDECLTYPE_D3DCOLOR - a D3DCOLOR (diffuse/specular colors) Method Normally this will always be set to D3DMETHOD_DEFAULT. See the SDK documentation for additional information. Usage This tells what the element's purpose in the declaration is:
- D3DDECLUSAGE_POSITION - this element represents a position of a vertex
- D3DDECLUSAGE_COLOR - this element represents a color of a vertex
- D3DDECLUSAGE_TEXCOORD - this element represents a pair of texture coordinates UsageIndex This is a flag that gives additional meaning to the Usage value. For example, a value of 0 on an item with a usage of D3DDECLUSAGE_COLOR means that this value designates diffuse color, while a value of 1 would designate specular color. There are many more possible values- see the DirectX SDK documentation under Vertex Declaration.
That said, here is a sample declaration that defines a position and a diffuse color:
D3DVERTEXELEMENT9 simple_decl[] = { {0, 0, D3DDECLTYPE_FLOAT3, D3DDECLMETHOD_DEFAULT, D3DDECLUSAGE_POSITION, 0}, {0, 12, D3DDECLTYPE_D3DCOLOR, D3DDECLMETHOD_DEFAULT, D3DDECLUSAGE_COLOR, 0}, D3DDECL_END() // this macro is needed as the last item! }; Also new to DirectX 9, vertex declarations are COM objects. Don't fret, however, as creating them is one simple call to the device:
IDirect3DVertexDeclaration9* my_vertex_declaration; d3d_device->CreateVertexDeclaration(simple_decl, &my_vertex_declaration); Now, get this - the above declaration is equivalent to the following fvf constant:
const DWORD simple_fvf = D3DFVF_XYZ|D3DFVF_DIFFUSE;
The FVF constant is obviously less code and complexity, so why use vertex declarations instead? Because they allow us to provide additional sets of vertex coordinates on separate streams for tweening, of course! They also are useful for multi-texturing and using the programmable vertex pipeline, as briefly mentioned earlier. For these reasons and more, it is definitely worth learning how to use them.
Vertex Tweening
And now for something completely different - the actual tweening. Although DirectX 9 implements it in software, you may want to check for Tweening support before you attempt to use it:
D3DCAPS9 caps; d3d_device->GetDeviceCaps( ∩︀ ); if(caps.VertexProcessingCaps & D3DVTXPCAPS_TWEENING) // Vertex tweening is supported. else // You're screwed Note: Actually, you aren't quite screwed. DirectX has a function for switching between hardware and software vertex processing, so you can use supported features in hardware, and unsupported features in software. To do this, you must set D3DCREATE_MIXED_VERTEXPROCESSING when you create the device. Then, when you need to switch to software rendering, use IDirect3DDevice9::SetSoftwareVertexProcessing(TRUE) and then go back to hardware processing when you are done with the feature with IDirect3DDevice9::SetSoftwareVertexProcessing(FALSE). I skirt the issue in the demo by just setting SOFTWARE vertex processing in my device creation.
So you have tweening support. Now what? You need a vertex declaration worthy of tweening, and here's the one I use in the example:
D3DVERTEXELEMENT9 tween_decl_ve[] = { {0, 0, D3DDECLTYPE_FLOAT3, D3DDECLMETHOD_DEFAULT, D3DDECLUSAGE_POSITION, 0}, {1, 0, D3DDECLTYPE_FLOAT3, D3DDECLMETHOD_DEFAULT, D3DDECLUSAGE_POSITION, 1}, {2, 0, D3DDECLTYPE_FLOAT2, D3DDECLMETHOD_DEFAULT, D3DDECLUSAGE_TEXCOORD, 0}, D3DDECL_END() // this macro is still needed as the last item! DON'T FORGET ;) }; d3d_device->CreateVertexDeclaration(tween_decl_ve, &tween_decl); As I hope you can see, I define two sets of vertex coordinates and a set of texture coordinates, all on separate streams. Using this declaration, I can have one vertex buffer for each keyframe, and one for all of the keyframes which contains the texture coordinates. Another important thing I want you to notice is the UsageIndex value on the two positional elements. The first UsageIndex is a 0, and the second one is a 1. This is important, because it identifies the two sets of positional data. The 0[sup]th[/sup] set is the beginning vertex we talked about in the interpolation section at the beginning, and the 1[sup]st[/sup] set is the ending vertex. These are the two we will morph between for our smooth animation.
Now, assuming you have the declaration, two vertex buffers of positional data and one of texture data, here's the rendering code:
static float tween_factor = 0.0f; // Remember, 0 is the starting frame tween_factor += 0.1f; // Incrementing tween factor moves // between the two frames if (tween_factor >= 1.0f) // 1.0 is the ending frame, so this frame tween_factor = 0.0f; // is finished. Start again at 0 // Enable tweening and set the TWEENFACTOR d3d_device->SetRenderState(D3DRS_VERTEXBLEND, D3DVBF_TWEENING); d3d_device->SetRenderState(D3DRS_TWEENFACTOR, FtoDW(tween_factor)); // Set our vertex declaration d3d_device->SetVertexDeclaration(tween_decl); // Set the stream sources that the vertex declaration will point to d3d_device->SetStreamSource(0, keyframe_VB[0]); // set to your first keyframe d3d_device->SetStreamSource(1, keyframe_VB[1]); // set to your second keyframe d3d_device->SetStreamSource(2, texture_VB); // your texture coord buffer d3d_device->SetIndices(model_IB); // Draw the tweened model! d3d_device->DrawIndexedPrimitive(D3DPT_TRIANGLELIST, 0, 0, vert_count, 0, tri_count); And there you go! Make sure to release your vertex declaration (as well as all other COM objects) when you are done:
tween_decl->release();
Conclusion
Using tweening as opposed to interpolating yourself has many benefits. The biggest one I see is that tweening can be done on vertex buffers, so it is faster than continually locking the buffers or using DrawPrimitiveUP. It's also a heck of a lot easier than interpolating on your own. And if the hardware supports it, it's going to be almost as fast as if you didn't interpolate at all!
I hope you have found this article useful. I decided to write it because I struggled to find information on vertex declarations and tweening in DirectX 9 when I was trying to figure it out not too long ago. This is the first article I've contributed, so make sure to tell me what you think! My e-mail is [email="bjmumblingmiles@hotmail.com"]bjmumblingmiles@hotmail.com[/email]. Make sure to download the source code and demo project! It includes my MD2 loader class designed for this kind of animation, if you're interested.
Note: One thing I'd encourage you to add to the demo is time-based movement. It's not too complicated, but you should understand the concept of linear interpolation before you try it. If you are interested, here is the equation: ?(interpolation percentage) = (frames per second)x(current time - last time)
OR
tween_factor += FPS*(current_time - last_time);
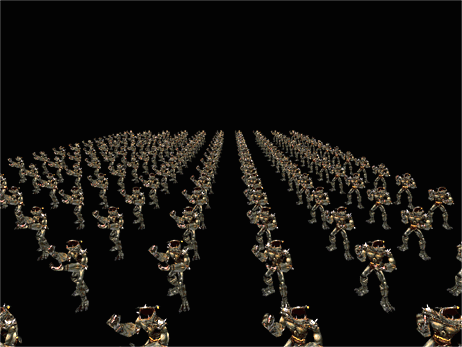
The screenshot below is based off the demo project, but you'll have to play around with it to get this scene:


