The real basics - definitions and my conventions
A heightmapped terrain is normally represented by a 2D grid of points, each having a height. The basic terrain is drawn by rendering 3D triangles using these vertices:
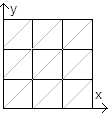 In this example we have a 4x4 grid - there are 16 points and 9 'tiles'. Note that an NxM grid will have (N-1)x(M-1) 'tiles'. Although in the view shown the grid looks like a 2D tiled surface, the fact that each vertex has a height means we have to draw two triangles for each tile, as shown by the diagonal lines. My convention is to label the bottom-left point of the grid (0,0) with x increasing to the right and y increasing up; I always split the tiles as shown. You could also do it like this:
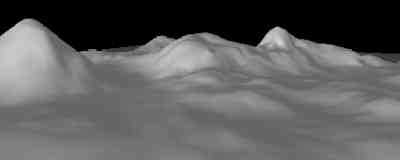
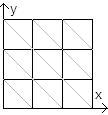 This representation of the terrain makes rendering the geometry of the landscape very simple - you just draw each quad, or pair of triangles, with the correct heights. It also makes creating/editing heightmaps simple. You can use images as a source of height data and thus create your terrain in MSPaint (!), or make an editor to set these data points instead. Rendering your heightmap might now look something like this:
Terrain coloring
The next thing you obviously want is to make the terrain more life-like by adding colors/textures to it. The simplest thing is to apply colors. You can assign a color at each vertex, or encode it into a texture which is stretched to cover the whole map. These options both require the minimum of Direct3D / OpenGL knowledge and are a good thing to do when starting your project, but they're never going to cut it for making interesting graphics:
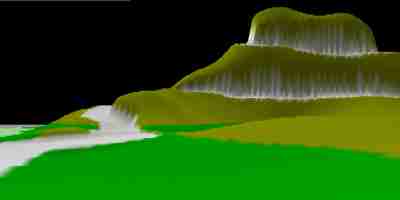 While at long distance the terrain looks detailed enough (the map is colored at a 1mx1m resolution here) the lack of fine detail makes the foreground bland, and it's hard to see what's there. There is one small extra step you can make to get your landscape looking at least a little interesting however - adding a detail texture...
Basic Terrain Texturing
Let's assume you have a renderer which draws the polygons for a heightmap, and also stretches a texture across the whole map. Size considerations mean this texture can only give basic color information - if you have a 1000x1000 heightmap representing 1Km square, a 4096x4096 texture will only give a resolution of .25m - it's just not possible to get enough detail onto the ground this way. So we'll just use this colored texture to provide the general color - greens for vegetation, browns for mud etc. Now to get detail, we apply another texture to the map. But we don't stretch the texture across the map - we repeat it many times. This texture might look a bit like static on the TV - a pretty random grayscale image. If we tile it once per metre in both directions, our terrain will be very detailed at close range but extremely monotonous in general. However if we apply this as well as the stretched colored texture, we get terrain which has large scale detail suggesting mud, grass, snow etc but is also detailed at close range so your eyes can get something to focus on. This technique is seen quite a lot in terrain demos because it's so easy, and as such is a good milestone to have in your progress - the first reasonably interesting representation of your landscape, especially with decent lighting and shadows. But if you've made a terrain renderer along these lines you'll soon see that it's still not particularly riveting, as the next image illustrates:
 Lots of other objects like cars, buildings etc can mask this but the fact that all your ground has the same appearance close up isn't realistic. While old games did things like this, coloring some bits of the map brown or green doesn't fool anyone these days! What we need is variation in the way different ground types (grass, sand...) appear at close range, rather than just their base colors...
Introducing ground types
In a general sense, what we need is pretty obvious. Each ground type - like grass #4, mud#23, tarmac etc needs its own detailed texture, which actually looks like the material being modelled. These could all be greyscale, blended with one large texture for the whole map which supplies the color, or we could dispense with that and simply have several high-detail colored textures for the different ground types we wish to have in our maps. The question we have is how to represent which bits of the map use which ground types, and the obvious answer is to tie this extra information to the vertices.
As a first try, it seems logical to continue with the 2D tiled approach and set each vertex with a ground type.
 In this illustration each tile is textured using the ground type for its bottom left corner vertex: (0,0), (2,0) & (1,2) use the green ground type, (1,0), (0,2) & (2,2) use the blue ground type and (0,1), (1,1) & (2,1) have the yellow ground texture assigned.
This system really isn't much more complicated to implement than the detail texturing already covered, although performance issues start to arise deciding what order to draw things in. Unfortunately, it looks probably worse than using the single detail texture method. Below are screen shots illustrating this method:

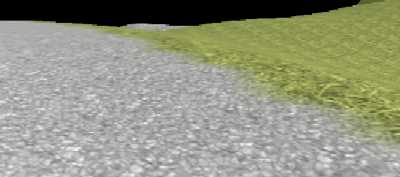
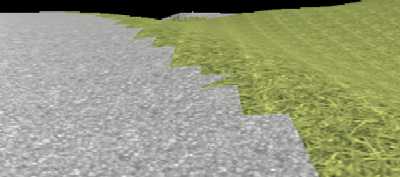 Although we now get the benefit of more realistic ground textures (despite the poor quality of those used here you can clearly differentiate the grey pebbles from the other textures) this is negated by the very obvious seams between different ground types. Before we go on to look at what I did to get around this problem, here's screenshots of the same scenes - in the current version of my editor:
Blending between ground types
It's quite clear that the joins between different ground types stand out in a horrible pixellated fashion. If the ground type detail textures are greyscale, the color data may slightly alleviate this by blending smoothly - you'll only get a sudden jump in the material, not the color too - but believe me it's nowhere near acceptable. What we want, in fact must have, is a way to get a smooth transition between strikingly different patterns and colors.
After some research on the web I found only one real solution suggested. Instead of drawing a tile with a single ground texture, every vertex should 'know' much of each ground type it uses. For instance 30% grass, 10% sand and 60% mud. In a basic interpretation of this, all the ground polygons on screen are drawn once for each ground type with the vertex alphas set to determine how much of that ground texture is used. Alternatively, one alpha texture exists for each ground type - this alpha texture is stretched across the whole map and sets how much of each ground texture is drawn everywhere. If you look around you can probably find some screenshots of such a technique, and admittedly they're pretty. But to me this system isn't so hot...
As I said, the two ways to store how much of each ground texture to draw are to store an alpha texture for the whole map for every ground texture, or to record an alpha value for every ground type at each vertex. An alpha texture is nice in that you just set the detail texture and its corresponding alpha map and draw all the triangles, repeating this process for each ground type. Very simple to code. However you have to render every triangle once for each ground type in the map. The tutorials and demos I've come across typically only have 4 textures in the map (grass, sand, snow, rock are common) so it's not too terrible, but even then consider how much of your map actually requires more than one ground type at the same time. I just don't believe a good level for a game can use only 4 ground types. A pretty terrain demo yes, a real game no. In my project (a racing game) I've already thought I'll need:
- Dust
- Mud
- Grass
- Gravel/shingle
- Sand
- Snow
- Tarmac
- Concrete It seems likely you'd want variations on at least some of these, so a fairly conservative set of terrain textures would maybe number 16. Rendering each polygon in your terrain 16 times is just stupid. Of course you can split your map into chunks and store which ground types are used in each chunk. Then you can see which ground types are actually in the scene you're about to render. But still you have to render every triangle say 3-5 times when most will just be using a single texture. There's also a high memory cost for this method. Say you have a 2Km x 2Km map and you want to model it at 1m resolution. You'd have a 2048x2048 alpha texture then for each ground type (2048 because it's 2^11 and power-of-2 textures are good to use), which is 4Mb per texture. With our set of 16 textures that's 64Mb of alpha textures. You can use compressed textures these days but on a lower spec card even then it'll be a big chunk of your resources, since your detail textures, models will need their space too. And I consider 16 textures and a 2000x2000 map reasonably conservative - I'd like to be able to have 50 ground types on maps up to 4000x4000 which would be 800Mb of uncompressed texture data!
You could instead store the alpha for each ground type for each vertex. To save memory and cut down on the polygons rendered, each vertex can say how many ground types it uses, and how much of each one. You can set a maximum number of ground types a vertex may use as well. However you have to do a lot of checking & general fiddling about for every ground type for each vertex. But to me this seemed the better approach to adapt/simplify to my own uses...
My approach to texturing the terrain
I came to form my method for rendering the terrain from the issues that I knew the normal methods would have problems with:- Easy to create and edit levels
- Ability to support many ground types (up to 100 or more)
- Not too memory hungry We started off the whole idea of multiple ground types by specifying a ground type for each vertex of the heightmap, and that's what I went back to look at.
 We already saw this illustration of assigning a ground type to each vertex. While the ground types were drawn as desired, the boundaries between different types are pixellated and discontinuous. However each quad is drawn using just one ground type - no blending at all. Instead, we could look at the ground types of all 3 vertices when drawing each triangle. It's very simple in theory - if we're working with ground type X then for each terrain polygon we set alpha to 1.0 (or 0xff, or 255 depending on your representation of colors) for the vertices using ground type X, or to zero for the vertices which don't. Of course we don't want to actually draw those polygons which don't use ground type X for any of their vertices, and it's the process of deciding which polygons to draw with each ground type that takes a bit of thought and work to get the rendering fast. This is basically a reduced version of storing how much of every ground type each vertex uses, limiting each vertex to a single ground type, but the simplifications greatly reduce the amount of CPU-intensive work which strangles the GPU. It's also feasible to pre-generate data at startup to reduce this work much further, at the cost of higher memory use. I don't want to go into that here though because it comes down to hardware-specific issues, which it is not my aim to discuss. A very un-optimised but simple implementation of this idea might look like this:
for(i=0 to numGroundTypes) { SetGroundTypeTexture(i); for(x=0 to mapWidth) for(y=0 to mapHeight) { GT_BL=GetGroundType(x,y); Alpha_BL=(GT_BL==i) ? 1 : 0 GT_BR=GetGroundType(x+1,y); Alpha_BR=(GT_BR==i) ? 1 : 0 GT_TL=GetGroundType(x,y+1); Alpha_TL=(GT_TL==i) ? 1 : 0 GT_TR=GetGroundType(x+1,y+1); Alpha_TR=(GT_TR==i) ? 1 : 0 if(Alpha_BL || Alpha_TL || Alpha_TR) DrawTriangle(x,y,Alpha_BL, x,y+1,Alpha_TL, x+1,y+1,Alpha_TR); if(Alpha_BL || Alpha_BR || Alpha_TR) DrawTriangle(x,y,Alpha_BL, x+1,y+1,Alpha_TR, x+1,y,Alpha_BR); } } The other major issue I faced was trying to get the same amount of color onto each part of the triangles being rendered. Lets imagine a triangle whose vertices use ground types A, B & C - the problems come from the way the alpha is interpolated across the triangle. Marked on this triangle are the mid-points of each side and the geometric centre of the triangle. The triangle will be drawn 3 times, and the colors for each pixel added to get the final result. For each pass, one vertex has alpha = 1 and the other two have alpha = 0. The alpha will be interpolated to decide how much of each ground type to actually add to the pixel values. If a pixel gets ground type A rendered with alpha of 0.7, B with 0.1 and C with 0.2 then these alphas sum to 1 - the pixel has been properly colored. On the other hand if a pixel gets A, B & C rendered at alpha 0.2 each, it will be very dark. And due to how triangles are rendered, the middle of our example polygon gets just this effect. You end up with a terrain with a regular pattern of dark spots which is really ugly.
My solution is to initially render the terrain without any blending, using one vertex of each triangle to source the ground type information. Next, we draw transparent triangles on top of these as required, but these are blended with the first layer using the alpha instead of simply added. For instance if a triangle uses the same ground type for all vertices nothing extra is done. If one vertex uses a different ground type then we draw a triangle using that ground type with the relevant vertex opaque and the other two transparent. Some pseudo-code might clarify this:
for(i=0 to numGroundTypes) { SetGroundTypeTexture(i); RenderOpaqueTriangles(i,VertexBuffer); } for(i=0 to numGroundTypes) { SetGroundTypeTexture(i); RenderTransparentTriangles(i,VertexBuffer); } An example of the kind of blending we get is shown here: This image shows a section of terrain in which a single vertex has been set to use the grass ground type - notice the smooth transition.
The reason I need to do two sets of passes is because simply setting vertex alpha doesn't give a correct distribution of color intensity across the triangle. But there's no reason that the alpha has to be simply interpolated from the vertices in such a coarse way. Instead it's reasonable to suggest that we could create an alpha texture which would ensure each pixel of the triangle gets exactly the right amount of each ground type. It might require more than one texture to do this, and obviously it uses another texture unit which can be an issue. However even if there's no visual improvement, this method would mean we don't have to cycle through all the ground types twice which reduces the number of texture changes - a significant performance consideration. However this is just a theory and I've not yet done any work trying to implement it - if anyone wants to try it or has other suggestions I'd be very interested to hear about it!
Well that's about all I wanted to cover here. I've deliberately not gone into too many specifics or put in code because I want this to be about algorithm not implementation. Having said that feel free to ask questions about any aspect of what I've covered at [email="webmaster@johndexter.co.uk?subject=Texturing%20Terrain"]webmaster@johndexter.co.uk[/email]


