To explain how to create the over-used, totally hyped "Lens Flare" effect that everyone seems to be talking about these days.
"Did you see the screenshots for , they had the coolest Lens Flares!!!"
[size="5"]Assumptions
I assume that you are familiar with 2d coordinate systems.
I assume that you are capable of using blit to compose the image.
[size="5"]Explanation of the Concepts
The basic idea is that when a bright light passes in front of a camera in real life, it typically creates a glare on each of the lenses within your camera. The physics of why and how the optics of lens flares work are irrelevant to achieving a believable effect.
Now, in your typical polygon-based 3d engine, you don't actually use multiple lenses in your calculations so we need to find a way to "fake" the illusion that the light is glaring off of several lenses within your virtual camera.
[size="3"]Ingredients:
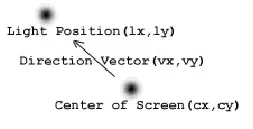
[bquote] The position of a light in screen coordinates(lx,ly).
The position of the center of the screen in screen coordinates(cx,cy).[/bquote]
Now that we have these two positions, we can calculate the direction vector from the center of the screen to the position of the light.The position of the center of the screen in screen coordinates(cx,cy).[/bquote]
// find the direction vector from the center to the light
 vx = cx - lx;
vy = cy - ly;NOTE: STORE THE LENGTH OF THE VECTOR...we'll call ours "length"
You'll also need several images to use as components of the effect. One of these images is typically a star-burst type of image. The others are usually halo type images. See below.
OK, so now we have three vectors:
[bquote] cx,cy = center of the screen
lx,ly = position of the light
vx,vy = normalized direction vector from the center to the light[/bquote]
and the four images from above...lx,ly = position of the light
vx,vy = normalized direction vector from the center to the light[/bquote]
Here comes the easy part...
Simply scale the normalized direction vector by the length to get the center coordinate of where to draw the primary "star-burst" image.
vx = vx * distance;
vy = vy * distance;top = vy - 64 + cy;
left = vx - 64 + cx;
right = vx + 64 + cx;
bottom = vy + 64 + cy;
// NOTE: MAKE SURE TO OFFSET BY THE CENTER POINTI've found the following values to work quite well...
| Flare | Length Scale | Image Scale |
| Primary Flare | length | 1.0 |
| First Halo | length/2 | .5 |
| Small Burst | length/3 | .25 |
| Next Halo | length/8 | 1.0 |
| Next Burst | -(length/2) | .5 |
| Next Halo | -(length/4) | .25 |
| Next Burst | -(length/5.5) | .25 |
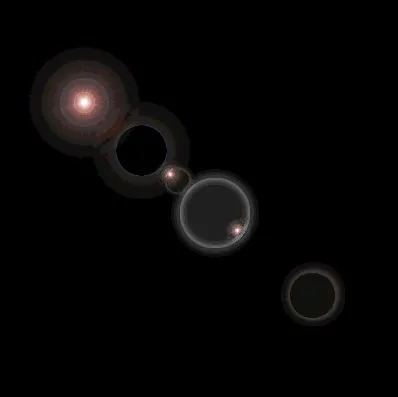
Below you can see a shot of the effect at work...Notice the lack of proper alpha-blending, this was due to the fact that I slapped the lens flare test project together with C++ Builder using straight SRCAND-style "blits"...gets the point across and only took about a half-hour to code...
For an actual high-quality example of this algorithm at work, be sure to download the Venom demo on March 2, 1998.
I hope you have enjoyed this short tutorial, if you have any questions or would like the source code to the C++ Builder project that this screen shot is from, send me an email.
-[email="3dguy@mediaone.net"]Alan Gordie[/email]
Reprinted with Permission


