I'll stop moaning now, and get on with what this article is actually supposed to be about. Part 2 was quite a complicated and fast paced article, and don't expect any let-off just yet - I'm going to be keeping up the pace for this article too. This is the outline:
- Using textures in Direct3D
- Loading 3D Models from files
- Using the Direct3D lighting engine
[size="5"]Using Textures in Direct3D
So far we've seen some basic 3D geometry - a spinning cube, you should be aware that the colour of the vertices depicts what colours you actually see when it's finally rendered. Yet you should also be aware that you cant really do more than create pretty-coloured gradients with it. Say we want to turn our 3D Box into something more interesting - say a wooden crate for example.
I don't think I need to tell you that it's almost impossible to create a decent wooden box appearance using just vertices and their colours. So we're going to use a bitmap to display the colours. As you should be aware, 3D geometry is made up of triangles, and a simple fact of a triangle defined in 3 dimensions is that it is planar - a 2D surface that doesn't have curves or anything like that. Thus it is perfectly suited for projecting a 2D bitmap image onto. This is the basis of texturing - we use a 2D bitmap applied to the 3D triangles in order to make the overall model appear to look more detailed / look like something.
The first step to using textures is to load the texture from the hard-drive / CD-ROM into texture memory. This causes one slight complication already - texture memory is a finite resource, yet art-work tends to happily consume an infinite amount of space! Therefore we can only fit a potentially small amount of art work into memory at any one time. This amount is indicated by the amount of memory the graphics card has "onboard". 32mb is common these days, with 16mb being a past favourite and 64mb being standard on all the new high-tech boards. It is quite easy to work out how much space you are using - based on the internal texture format and the dimensions of the texture itself, also dependent on any additional space required for mip-mapping.
I discussed the CONST_D3DFORMAT enumeration in the previous article - what the letters mean, what the numbers are for... if you cant remember that then go read the previous article. As you are aware, a bitmap is made up of a 2D grid of pixels, we need to use the CONST_D3DFORMAT enumeration to tell Direct3D how to store the colour for each of those pixels - 32 bit, 16 bit... As you should be aware, 32 bit = 4 bytes, 16 bits = 2 bytes. If we store a standard 256x256 bitmap with 32 bits per pixel we'll need 256kb of texture memory, however, if we store it at 16 bits per pixel we'll only need 128kb of texture memory. This may seem fairly trivial for only one texture - and it is; but if you have 200 textures it's the difference between 50mb and 25mb - suddenly it means a lot more! 25mb will fit into most recent video cards, 50mb will only fit into the (current) top of the range 3D cards. The bottom line being that you must be clever with your choice of texture format. As a general note, you will tend to find that your game runs much faster if the display mode format and the texture formats are the same - as it saves any last minute format conversions from being done (which is just a tiny bit more work to be done).
This following little piece of code will allow you to check what texture formats can be used by the currently installed 3D board. The last parameter (D3DFMT_X8R8G8B8 in this case) indicates the texture format you want to test.
If D3D.CheckDeviceFormat(D3DADAPTER_DEFAULT, D3DDEVTYPE_HAL, _
 D3DWindow.BackBufferFormat, 0, D3DRTYPE_TEXTURE, _
 D3DFMT_X8R8G8B8) = D3D_OK Then

 Debug.Print "32 Bit textures with no alpha are supported"
End If- Stick to using 2[sup]n[/sup] texture dimensions, that is 2,4,8,16,32,64,128,256 and so on... anything above 256x256 is getting a little risky - the very popular Voodoo3 chipset doesn't support textures above 256x256 in size, which instantly causes a problem with compatibility. 256x256 is also the optimal size for a texture and tends to give the best all round performance.
- Textures don't have to be square. This may well cause some problems with very, very old graphics, but we cant be compatible with everyone now...
- Where possible, group small textures onto one larger texture, this is known as texture-paging sometimes. For example 64 32x32 tile pictures will be okay as 64 different textures, but it'll run much faster to store them all as one 256x256 texture.
D3D.GetDeviceCaps D3DADAPTER_DEFAULT, D3DDEVTYPE_HAL, DevCaps
Debug.Print "MAX TEX SIZE: ", DevCaps.MaxTextureWidth & "x" & DevCaps.MaxTextureHeightCreateTextureFromFile( _
Device As Direct3DDevice8, _
SrcFile As String) As Direct3DTexture8
CreateTextureFromFileEx( _
Device As Direct3DDevice8, _
SrcFile As String, _
Width As Long, _
Height As Long, _
MipLevels As Long, _
Usage As Long, _
Format As CONST_D3DFORMAT, _
Pool As CONST_D3DPOOL, _
Filter As Long, _
MipFilter As Long, _
ColorKey As Long, _
SrcInfo As Any _
Palette As Any) As Direct3DTexture8Set CubeTex = D3DX.CreateTextureFromFileEx(D3DDevice, _
App.Path & "\cube_tex.jpg", _
256, 256, 1, 0, _
DispMode.Format, D3DPOOL_MANAGED, _
D3DX_FILTER_LINEAR, D3DX_FILTER_LINEAR, _
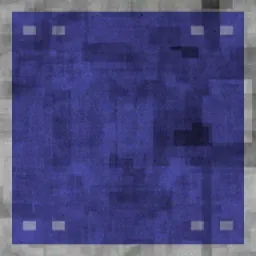
0, ByVal 0, ByVal 0)The above code will now have loaded the following image into texture memory:
It's not an amazingly interesting texture, but it'll look alright on our box. The next thing that I need to discuss is texture coordinates.
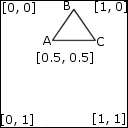
Texture coordinates are a fun topic, well actually, they're not - because you either get it or you don't; if you don't then you're screwed! I'm only going to go over it briefly here - hopefully you will follow, otherwise, ask some people in the forums on this site, or go in search of some other more in-depth texturing tutorials. The following diagram is required for reference:
The above diagram can be imagined as the Cube_Tex.jpg shown above. You should be familiar with coordinates in a normal 2D image - X and Y, measured in pixels. We now replace this coordinate system with a scalar system - all pixels are referred to on a 0.0 to 1.0 scale; this is unaffected by the actual pixel dimensions - 256x256 or 128x256, it doesn't matter - they both still use the 0.0 to 1.0 scale. This makes things surprisingly easier actually. Both for us, and for the 3D accelerator. It means that we can interchangeably use different sized textures (a low-res version and high-res version) with the same piece of code, and expect to get an almost identical result. It also makes it much easier to algorithmically generate texture coordinates (a bit more advanced).
In the above diagram the four corners are labelled with their respective coordinates. I've also drawn a simple triangle on the diagram marked with three vertices, A B and C. At a guess, I'm thinking that A will have coordinates of [0.4,0.3], B will be [0.6,0.1] and C will be [0.75,0.3] - it's only a rough guess, and you could calculate it exactly if you wanted... but I didn't! If this new coordinate system really confuses you still you can use a simple conversion formula: (1/Width)*X, (1/Height)*Y, where width, height, x and y are all pixel measurements. On a final note, texture coordinates are usually denoted using U,V and W rather than X,Y and Z - however U=X, V=Y, W=Z. It is advised to stick to convention so that other people understand what you're doing.
Now that we've covered loading textures and their coordinate system we can actually try rendering something with it! I'm going to use the cube from the second part of this series - the one with no indices and no vertex/index buffers. There is a good reason for this - I want each vertex to have it's own, different, texture coordinate. This gets difficult when using indices, as in the case of the cube, 3 sides share each vertex, between 3 and 6 triangles as well; therefore I'd need to express up to 6 texture coordinates as a single coordinate - not easy, or in this case, just not possible. Therefore I'm going to have to use the lots-of-vertices cube.
The first step is to assign texture coordinates to each of the vertices, I've only copied out the code for the first face, because it's identical for the other 5, and only takes up lots of space:
[font="Courier New"][color="#000080"][bquote]CubeVerts(0) = CreateLitVertex(-1, 1, -1, Corner010, 0, 0, 0)
CubeVerts(1) = CreateLitVertex(1, 1, -1, Corner110, 0, 1, 0)
CubeVerts(2) = CreateLitVertex(-1, 1, 1, Corner011, 0, 0, 1)
CubeVerts(3) = CreateLitVertex(1, 1, -1, Corner110, 0, 1, 0)
CubeVerts(4) = CreateLitVertex(1, 1, 1, Corner111, 0, 1, 1)
CubeVerts(5) = CreateLitVertex(-1, 1, 1, Corner011, 0, 0, 1)[/bquote][/color][/font]
The parameters in bold are the two texture coordinates.CubeVerts(1) = CreateLitVertex(1, 1, -1, Corner110, 0, 1, 0)
CubeVerts(2) = CreateLitVertex(-1, 1, 1, Corner011, 0, 0, 1)
CubeVerts(3) = CreateLitVertex(1, 1, -1, Corner110, 0, 1, 0)
CubeVerts(4) = CreateLitVertex(1, 1, 1, Corner111, 0, 1, 1)
CubeVerts(5) = CreateLitVertex(-1, 1, 1, Corner011, 0, 0, 1)[/bquote][/color][/font]
The second step is to actually render the cube with the texture applied - which is actually very very easy.
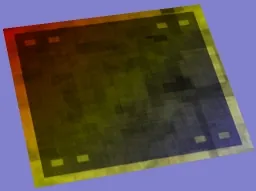
The final result looks like this:
Hmm, so what's gone wrong here then? It's red and yellow? Not much like the picture of the texture above... well, actually, nothing has gone wrong - you've just seen the effects of Direct3D lighting. As you may remember, the original cube geometry had 8 different colours for the corners, well it's these colours that are blending with the texel data to form the final rendered image. This can be used to create brilliant effects - as we shall see later on in the lighting section. If we replace the vertex colours with white then the original texture wont be affected at all - and you'll get an image like this next one:
Which probably looks much more like what you expected.
Okay, so that's texturing covered. Well, as much as you need for a foundation. There is literally tonnes and tonnes more to learn about texturing - but leave it alone till you have this part sorted out in your head. The main areas of advanced texturing come under these headings:
Alpha channel effects - opacity/transparency effects in textures.
Altering pixel data - generating procedural textures, or applying per-pixel effects.
Compression - by default the D3DFMT_DXT* formats.
The Texture cascade - where you can apply up to 8 textures to each triangle - capable of creating some stunning effects (bump mapping, specular lighting to name two).
Pixel shaders - very, very advanced texture effects - brand new to Direct3D8, and quite likely to become a big part of Direct3D 9 and 10...
To get you started on tutorials for some of those features I have the following links:
http://www.ancientcode.f2s.net - has a good article on binary manipulation, and it's uses in altering pixel data.
http://www.vbexplore...GR_Lesson12.asp - a tutorial on the texture cascade and the effects it presents.
http://www.vbexplore...GR_Lesson14.asp - a tutorial on accessing and manipulating texture memory.
http://www.vbexplore...GR_Dot3Bump.asp - a tutorial on using the texture cascade to do Dot-3 bump mapping.
[size="5"]Loading 3D Models into Direct3D
As we've seen so far, you have to manually (or algorithmically) create all the geometry you use. This is absolutely fine for things like cubes, spheres, triangles etc... but how about trying to create a model of a person - in particular an animated character? I know you people aren't stupid - and you wouldn't try to manually type in all the vertices... J The other important factor is the data-driven architecture - A very powerful and popular game programming system. If all your geometry is stored in files, then you need only alter those files for it to be globally changed across the whole game - rather than sifting through all your code, making the changes then recompiling...
So what exactly makes up a model? In general it's just a collection of vertices, indices, textures and materials that when rendered appear as a complete model. They are often referred to as objects or meshes. In general, it's a self contained instance that will, to a certain degree, manage itself.
This is where 3D modelling packages such as maya, milkshape 3d, 3DS Max, Truespace, lightwave etc... come into play. One of more of these programs will become your best friend when it comes to creating 3D geometry, purely because they're designed to do it, and are exceptionally good at doing it. Learning a 3D modelling package properly can be as hard, or harder than the actual programming - I strongly recommend getting and reading a good book on your 3D modeller (unless you're already competent of course).
Our task for this section is to take a model created in one of these programs and load it into our Direct3D program for real-time viewing. This is actually a surprisingly easy task. I happen to use 3D Studio Max to do my modelling, and it's native format is the .3DS format - which is convenient as Microsoft built in a converter for the .3DS format to .X format. The .X format is Microsoft's native DirectX file format - and is therefore built into the D3DX API quite nicely. This is all great IF you're using the correct tools, if you aren't then you'll need to write your own data parsing function to convert the data in the file into D3D acceptable triangle/vertex data.
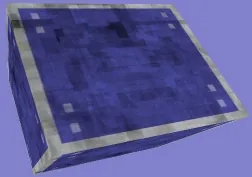
To demonstrate using models in direct3d I made a more complicated version of the original cube model. Using 3D Studio Max this was a fairly trivial process of extruding backwards certain parts of each face - such that I was left with a raised border around each face. I then used Max's powerful texturing tools to make the raised borders use the grey part of the texture, and the inner panel to use the purple/blue part of the texture. The final results looked like this:
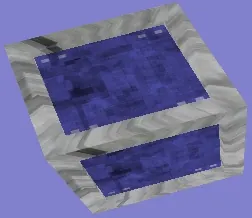
The 3D effect of the borders isn't too apparent from this static shot; but when you see it rotating in real-time you can notice them quite easily. This next shot shows the geometry in wireframe mode:
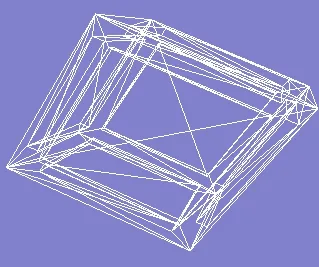
This final shot looks quite complicated, because you can see all 6 faces of the cube at once - and as each one has quite a bit of geometry it does look like a mess of lines! However, you can still clearly see that this version is considerably more complicated than the original hard-coded cube model.
Now, onto the code. Luckily for you, the code is really quite simple for both loading, and rendering of models. If you have to write your own loading function then it could get a little more complicated - depending upon how you code it. We need 4 global declarations before we can get started loading models:
Dim nMaterials As Long
 Dim MeshMaterials() As D3DMATERIAL8
 Dim MeshTextures() As Direct3DTexture8
Dim CubeMesh As D3DXMeshSet CubeMesh = D3DX.LoadMeshFromX(App.Path & "\cube_3d.x", D3DXMESH_MANAGED, _
D3DDevice, Nothing, mtrlBuffer, nMaterials)
If CubeMesh Is Nothing Then GoTo BailOut: '//Dont continue if the above call did not work
ReDim MeshMaterials(nMaterials) As D3DMATERIAL8
ReDim MeshTextures(nMaterials) As Direct3DTexture8
For i = 0 To nMaterials - 1
'//Get D3DX to copy the data that we loaded from the file into our structure
D3DX.BufferGetMaterial mtrlBuffer, i, MeshMaterials(i)
'//Fill in the missing gaps - the Ambient properties
MeshMaterials(i).Ambient = MeshMaterials(i).diffuse
'//get the name of the texture used for this part of the mesh
TextureFile = D3DX.BufferGetTextureName(mtrlBuffer, i)
'//Now create the texture
If TextureFile <> "" Then 'Dont try to create a texture from an empty string
Set MeshTextures(i) = D3DX.CreateTextureFromFileEx(D3DDevice, App.Path & "\" & TextureFile, _
256, 256, D3DX_DEFAULT, 0, _
D3DFMT_UNKNOWN, D3DPOOL_MANAGED, _
D3DX_FILTER_LINEAR, D3DX_FILTER_LINEAR, _
0, ByVal 0, ByVal 0)
End I
Next I
Debug.Print "Number of Faces in mesh: " & CubeMesh.GetNumFaces
Debug.Print "Number of Vertices in mesh: " & CubeMesh.GetNumVertices
Debug.Print "Number of segments in mesh: " & nMaterialsAlso note, that the LoadMeshFromX( ) function gets extremely slow when dealing with medium-large geometry files. Because all the processing is done away from your application you cant easily output a status bar showing the progress of loading it. This is one reason why people often write their own object formats - Ones I have written in the past have loaded a 2000 vertex model in <250ms, whereas with D3DX it's taken 3 seconds or more... This is also partly due to the .X file format specification including lots and lots of other rubbish that you may not actually be interested in - frame hierarchies, animation information; in general it's a very flexible format, but you can get a considerably smaller file, and considerably faster loading times should you design a custom format that is specific to exactly what you want.
The final part for dealing with models is to render them. Luckily for us, this is also very, very simple. These following lines should be placed within a BeginScene()...EndScene() block:
For i = 0 To nMaterials - 1
 D3DDevice.SetTexture 0, MeshTextures(i)
 D3DDevice.SetMaterial MeshMaterials(i)
 CubeMesh.DrawSubset i
Next ISeveral of the more popular file formats - mdl, md2, md3, 3ds etc... are covered on www.wotsit.org - a great site for all file specifications! You will also find several articles on this site about 3ds file formats.
[size="5"]Using Direct3D Lighting
Okay, onto our final section for this article. Lighting in general is a very important topic to understand, and unfortunately, it is quite complicated as well.
It is often a good idea to look at cinema for lighting - cinema has been around for about a century now, and has progressed into a fine art form, and one of the many things that makes or breaks a scene in a film is the lighting, yet the key aspect is that you don't necessarily notice it. Ambient lighting is a very subtle effect that will often set the atmosphere for a film - how many horror films have the scary scenes in broad daylight/with the lights on (well, I know there are a few!). Shadows and the type of lighting (strobe, direct, soft, bright, dark) are also huge factors. In my opinion, computer gaming is only just starting to catch up with true artistic lighting, In the last year or so many of the level-architecture articles on websites have specifically brought lighting up as a major topic - whereas before it was just "put the light where it looks best"... Games such as Max-Payne are the first to put the best lighting algorithms (ray tracing/radiosity) to great use, and I expect many future games to follow this pattern.
Don't get your hopes up straight away though - the Direct3D lighting engine, whilst complicated, is still very, very simple. The first point to notice is that it wont generate shadows, secondly, it doesn't handle reflection or refraction, thirdly, it's only an approximation - accurate only at each vertex. The more complicated solutions require the use of light maps, and other pre-calculated methods (which are too complicated to go into here). I read somewhere that many of the Max-Payne maps required several hours of pre-processing just for the lighting algorithm, so you can appreciate why it's not done in real-time J
For now, we'll be happy with the Direct3D lighting engine, once you have mastered this then you can begin to consider other models.
You have actually already seen the effects of the lighting engine in all 3 parts of this series. Whenever we specified a colour for a vertex, and got the gradient of colours across a triangle we were actually seeing D3D lighting at work. To save on processing times, Direct3D will linearly interpolate across a triangle the colours from its 3 vertices - it assumes that the light won't change considerably between them. This, to a certain degree, won't matter for small triangles, but for larger triangles this causes a big problem - if none of the vertices fall within the lights range then it wont be lit, even if a large area of the triangle is actually within the lights range.
In order to proceed with lighting you must use a little maths, the proof behind these equations isn't really too important, all you need to know is how to use the equations to get the results you want. As I've already stated, Direct3D performs its calculations on a per-vertex basis, thus we must include some extra information with every vertex - a normal vector. This vector indicates what direction the vertex is facing, which may seem a little strange - but it makes perfect sense really: A triangle facing away from the light should get no light, whereas a triangle facing the light directly should get lots of light, and how do we tell if the triangle is facing the light or not? Use the normal...
Typically the normal will represent the direction the triangle is facing, however, it doesn't have to! Whilst it often looks a little strange, you can do strange things to the normal and get some very odd effects - not very good for realistic scenes, but fine for more humorous scenes. You also have to take much more care over indices when using D3D lighting - if a two (or more) triangles share the same vertex, what direction is it facing? One way of doing this is to generate a normal for each triangle, then average them out to give a final direction for the shared vertex. This method usually works a treat, but there are times when it generates results that look wrong for all the triangles concerned...
If we have a triangle defined by the three vertices v0,v1,v2 then the normal is going to be found using the following function:
Private Function GetNormal(v0 As D3DVECTOR, v1 As D3DVECTOR, v2 As D3DVECTOR) As D3DVECTOR
 '//0. Any Variables
 Dim v01 As D3DVECTOR, v02 As D3DVECTOR, vNorm As D3DVECTOR

 '//1. Get the vectors 0->1 and 0->2
 D3DXVec3Subtract v01, v1, v0
 D3DXVec3Subtract v02, v2, v0

 '//2. Get the cross product
 D3DXVec3Cross vNorm, v01, v02

 '//3. Normalize this vector
 D3DXVec3Normalize vNorm, vNorm

 '//4. Return the value:
 GetNormal = vNorm
End FunctionPrivate Function GetNormal2(v0 As D3DVECTOR, v1 As D3DVECTOR, v2 As D3DVECTOR) As D3DVECTOR
'//0. Any Variables
Dim L As Double
Dim v01 As D3DVECTOR, v02 As D3DVECTOR, vNorm As D3DVECTOR
'//1. Get the vectors 0->1 and 0->2
v01.X = v1.X - v0.X
v01.Y = v1.Y - v0.Y
v01.Z = v1.Z - v0.Z
v02.X = v2.X - v0.X
v02.Y = v2.Y - v0.Y
v02.Z = v2.Z - v0.Z
'//2. Get the cross product
vNorm.X = (v01.Y * v02.Z) - (v01.Z * v02.Y)
vNorm.X = (v01.Z * v02.X) - (v01.X * v02.Z)
vNorm.X = (v01.X * v02.Y) - (v01.Y * v02.X)
'//3. Normalize this vector
L = Sqr((vNorm.X * vNorm.X) + (vNorm.Y * vNorm.Y) + (vNorm.Z * vNorm.Z))
vNorm.X = vNorm.X / L
vNorm.Y = vNorm.Y / L
vNorm.Z = vNorm.Z / L
'//4. Return the value:
GetNormal = vNorm
End FunctionOne important factor that I haven't mentioned yet, is that the vertices, v0,v1,v2 need to be in a clockwise order - you should be aware of this, due to the implications of culling by the D3D renderer, but for the maths above, if the triangle vertices were in an anti-clockwise order then the resulting normal would point in the opposite direction - which, in most cases would mean that your vertices don't get lit...
Now that I've covered generating normals, we need to know what to do with them. The following excerpt is the vertex FVF declaration, and the vertex type:
Const FVF_VERTEX = (D3DFVF_XYZ Or _
 D3DFVF_NORMAL Or _
 D3DFVF_TEX1)

 Private Type VERTEX
 P As D3DVECTOR
 N As D3DVECTOR
 T As D3DVECTOR2
End TypeTo demonstrate D3D lighting I'm going to use the two methods already demonstrated in this article - texturing and model loading... simply because it allows me to show you the effects easily.
There are 4 types of light provided for you by Direct3D - point, spot, direction and ambient lights. The first 3 require that you set up a special D3DLIGHT8 object that describes the light, the fourth requires that you set a render state. The following list covers the 4 types of light, in order of processing speed:
[size="3"]Ambient Lights
Ambient lights have no source, no direction and no range - they affect every vertex rendered. The basic result is that no vertices are rendered darker than the currently specified ambient colour - setting it to a dark grey will result in everything being visible a small amount. We set the ambient light value using the following code:
D3DDevice.SetRenderState D3DRS_AMBIENT, D3DColorXRGB(100, 100, 100)Directional lights are good for general shading of a scene, such that everything is evenly lit up, but you also get a dark side to every object. They can be used very effectively as a sun object.
Directional lights have direction and colour only, no range, no position and no attenuation (see Point lights for more details). A completed Directional light structure looks like this:
Dim lghtDirectional As D3DLIGHT8

 lghtDirectional.Type = D3DLIGHT_DIRECTIONAL
 lghtDirectional.Direction = MakeVector(0, -1, 0)
 lghtDirectional.position = MakeVector(1, 1, 1) 'shouldn't be left as 0
 lghtDirectional.Range = 1 'shouldn't be left as 0
lghtDirectional.diffuse = CreateD3DColorVal(1, 0, 1, 0) 'green lightPoint lights have a position and a range, but no direction - they emit light in all directions. A simple real world analogy would be a light-bulb. To set up a point-light you need to fill out a D3DLIGHT8 structure:
Dim lghtPoint As D3DLIGHT8

 lghtPoint.Type = D3DLIGHT_POINT
 lghtPoint.diffuse = CreateD3DColorVal(1, 1, 0, 0)
 lghtPoint.position = MakeVector(0, 0, -10)
 lghtPoint.Range = 25#
 lghtPoint.Attenuation0 = 0#
 lghtPoint.Attenuation1 = 1#
lghtPoint.Attenuation2 = 0#For those mathematicians amongst us, the general attenuation formula is:
A = 1 / (Attenuation0 + D*Attenuation1 + D2*Attenuation2)The other point to note is that when specifying colours they are on a 0.0 to 1.0 scale, rather than the standard 0-255 scale. This is because you can specify negative values, and values >1, allowing extra bright lights, and "dark" lights that remove colour rather than add it.
[size="3"]Spot Lights
Finally, we get onto spot lights. These are the slowest type of lighting available, but in some cases look by far the best (A tunnel with several spot lights shining down from the ceiling for example). Hopefully you can visualise in your head a spot-light, and how they interact with the world - a cone of light projected from one point in one direction, brightest in the middle, getting darker towards the edge... It is the fact that it is based on a cone that it requires more calculation time - we need to work out IF it's in the cone, and how close to the "centre" of the cone (for brightness). A completed D3DLIGHT8 object for a spot-light will look like this:
Dim lghtSpot As D3DLIGHT8

 lghtSpot.Type = D3DLIGHT_SPOT
 lghtSpot.Range = 50#
 lghtSpot.diffuse = CreateD3DColorVal(1, 0, 0, 1)
 lghtSpot.Direction = MakeVector(0, 0, 1)
 lghtSpot.position = MakeVector(0, 0, -10)
 lghtSpot.Theta = 0.25 * PI
 lghtSpot.Phi = 0.5 * PI
 lghtSpot.Attenuation0 = 0.1
 lghtSpot.Attenuation1 = 1#
lghtSpot.Attenuation2 = 0#Now that we've learnt how to configure a D3DLIGHT8 object for all 3 main types of light, we're going to need to let the device know about them. You can register as many light objects as you want with D3D, BUT you can only have a certain number enabled (on) at any one time. You can detect how many lights may be turned on at any one time by using the D3DCAPS8.MaxActiveLights value. If you enable more lights than are supported the call tends to fail, or if it does succeed then it wont actually process the light when doing the calculations... This value tends to be 8 - 16 on the GeForce cards, for most older cards it'll return -1, which indicates that an unlimited number of lights can be "on" at any one time; However, the more lights you enable the slower your program will run.
D3DDevice.SetLight 0, lghtPoint
 D3DDevice.SetLight 1, lghtDirectional
 D3DDevice.SetLight 2, lghtSpot

 D3DDevice.LightEnable 0, 1
 D3DDevice.LightEnable 1, 1
 D3DDevice.LightEnable 2, 1

D3DDevice.SetRenderState D3DRS_LIGHTING, 1To show off the lighting we'll need a new model to play with. The cube mesh I made/showed earlier isn't complex enough to show off the new lighting code; instead I'm going to use a much higher vertex-density mesh. This will mean that it runs considerably slower on most machines, but this is only a demo...
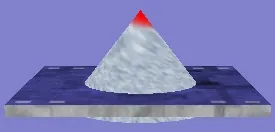
First off: A solid, unlit version of the geometry
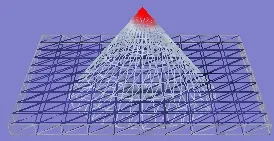
Second: A wireframe version, to show you the complexity of the geometry (3384 vertices)
Third: The (red) Point light which is located directly below the camera in this shot, notice the distribution of the lighting.
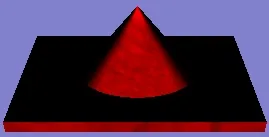
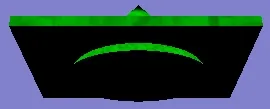
Fourth: The (Green) Directional Light. Notice that the lighting is evenly distributed, and that the entire "bottom" is unlit. Also notice, that if shadows were cast, the bottom of the cone would not be highlighted in green.
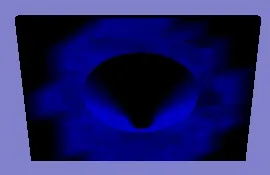
Fifth: The (Blue) Spotlight, notice a very distinct spot - indicating the presence of a cone.
Lastly: A nasty mess of all the colours - where the red and blue lights colour the same section we get magenta, in other parts we have a yellow colour.
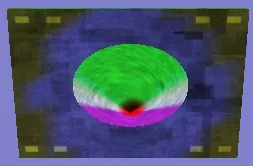
One thing that is quite clearly visible on the last two is that the lighting on the very tip of the cone isn't lit in the same way that the rest of the cone/model is. This is done deliberately here to show off how textures can affect the final colour. Take the colour red (as on the nose), it can be represented as RGB(255,0,0). If we then use a lighting colour of RGB(0,1,0) we'll get various shades of green, and only green, interpolated across the triangle. This is important - if there was no texture applied, there would ONLY be green pixels. To get the final pixel colour we MULTIPLY the interpolated lighting colour with the texel colour: RGB(R[sub]t[/sub]R[sub]l[/sub], G[sub]t[/sub]G[sub]l[/sub], B[sub]t[/sub]B[sub]l[/sub]) where X[sub]t[/sub] = texture and X[sub]l[/sub] = lighting. If we go back to the original example of a red texel colour, RGB(255,0,0), and a green light, RGB(0,1,0) that multiplied colour works out as RGB(255*0, 0*0, 0*1) = RGB(0,0,0) = Black! Which is what you can see in the above screenshots. The bottom line is this: If the texture doesn't contain any (or very little) of the channel that the light uses, then the resulting pixel will be black. This is easily solved by using ambient lighting; but can also be a useful tool for lighting effects.
[size="5"]Conclusion
Okay, so this 3 part series is now complete. I really, really hope that you liked it - either way, drop me an email at [email="Jollyjeffers@Greenonions.netscapeonline.co.uk"]Jollyjeffers@Greenonions.netscapeonline.co.uk[/email], constructive comments are always welcome. From the emails I've received recently this series has been very successful.
You can download the source code for this tutorial. I strongly suggest that you do this as many of the topics discussed here are much easier to understand when you see it "in action".
As for DirectX programming - you should now have enough knowledge to write a very simple game / engine. Don't be a fool and try a "simple Quake clone", it's not going to happen. However, a nice 3D pong/breakout clone, or a simple maze/puzzle game would make for a good learning project. There is absolutely tonnes and tonnes of stuff left to learn! I have been working with DirectX for 2-3 years now (version 5,6,7,8) and I don't think I've ever learn everything in every release of the API - close, but not quite!
As a final note, this may be the last in this series, but I do have a website that will continue to be updated - where you can find more in depth tutorials on the content covered in this series, more advanced tutorials, and generally newer content. Check it out at http://www.vbexplore...tx4vb/index.asp
Many thanks for getting this far with my series.
Jack Hoxley




These articles were a great find - I picked up an old copy of VB5 second hand years ago, probably stolen from some office… Never expected to do much with it, but in the end I realised my dream since the early 90s of making a proper 3d game. 3, in fact, all fairly simple platform adventure games, but with animations, transforms, shadows, and other cool stuff I completely learned here. Though sound was always a weak point for me (I never got past just using the MMControl thing, which is rather out of its depth handling game music and proper FX…).