While developing the terrain engine for my current project I came across an interesting problem. I had these great big maps with fast load time and an easy to use class structure that fit perfectly with the rest of my engine's code, but I did not have any way of looking around. To solve my problem I decided to include in my engine a camera class so I would not have to manually set it to the position I wanted and then compile and run the program (a very time consuming process), and here is what I have come up with.
What you need:
- Some basic knowledge of trigonometry will help
- Patience
- Potato Chips
Where to Start:
First, I will explain some of the basics of what my camera class does, and the math behind its calculations. I use Managed DirectX 9 and C# for development, but there is only one DX function involved in creating the camera and moving it around anyway so it shouldn't be a problem if you use something else (OpenGL or unmanaged runtimes).
To start with, we have to understand some things about circles, triangles, and polar coordinates (I promise it sounds harder than it really is).
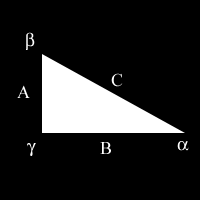
Here is our basic triangle figure:

Here we see sides A, B, and C and angles Alpha, Beta, and Gamma. Gamma is 90 degrees (Pi/2 radians) and side C is the hypotenuse. For our Camera class we will be using two trigonometric functions sine and cosine (sin, cos). The sine of an angle is the ratio of the side opposite it to the hypotenuse (remember SOH CAH TOA?), and the cosine of an angle is the ratio of the side adjacent to it over the hypotenuse. In our case, the sine of Alpha is A/C and the sine of beta is B/C. With that knowledge, we move to polar coordinates.
Polar Coordinates
The basic trigonometry ideas can be extended for use in a circular format, which fits well with how we will implement our camera.
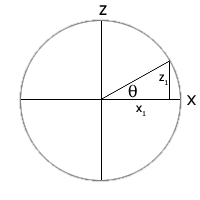
Here is our basic circle figure:

Here we can see a circle on top of a coordinate plane (we use x and z here for the horizontal plane of the world), an angle, and two sides of a right triangle, x1 and z1. Using the trigonometry from before we can find the coordinates of any point on a circle by using sine and cosine:
sin(theta) = Opposite over Hypotenuse = z1/radius
cos(theta) = Adjacent over Hypotenuse = x1/radius
After a little multiplication, finding the coordinates of a point is as simple as
x = radius*sin(theta)
z = radius*cos(theta)
We will be using these two equations for our camera model.
Defining our Class
In DirectX, the view matrix is created by a function like this:
device3D.Transform.View = Matrix.LookAtLH(cameraPosition,
                          cameraTarget,cameraUpVector);
By creating our camera class with static vectors for variables, we are free to modify them from anywhere in the code and allow for camera adjustments for many reasons (animations, controls, flybys, etc.)
To start with, our class will have seven properties. Three of them will be the vectors required by the Matrix.LookAtLH function, two will be the number of radians of rotation in each direction, and the other two will have to do with the distance of movement and distance of the viewpoint from the camera. The radians will only be modified by the class itself and so are declared as private variables.
public static Vector3 cameraPosition;
public static Vector3 cameraTarget;
public static Vector3 cameraUpVector;

private static float hTheta;
private static float vTheta;

public static float radius = 1;
public static float moveDist = 1f;
Along with these attributes, our Camera class will also have four functions. Since the class is static, we will have an initial function called SetCamera that will take our initial values. Defaults can also be set up in the attributes if you find it more useful. We will also have three types of movement associated with our Camera. Sliding along the vertical and horizontal planes, rotating the view, and moving forward and backward in the direction the camera is facing. All these will also be static so they can be called from anywhere within the code.
public static void SetCamera(Vector3 cPosition, float h, float v){}
Setting the Camera consists of giving its position and angles that it is rotated in the x-z plane and in the y direction (horizontal and vertical).
public static void RotateCamera(float h, float v){}
Rotating the Camera is possible in both the horizontal and vertical directions, and the function takes these as parameters.
public static void SlideCamera(float h, float v){}
SlideCamera can occur in both directions as well.
public static void MoveCamera(float d){}
Since moving the Camera occurs with all of the current angles and the distance in each direction can be calculated all we need is a distance forward or back at the current angle.
Now for some more wonderful math!
Making it all work
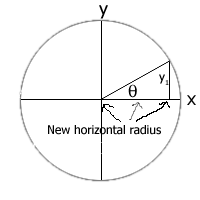
To start we will fill in what the SetCamera does with its parameters. Since we have the position vector, our first variable for the Matrix.LookAtLH function is already known. To find the point it is looking at we use the current cameraPosition and the distances the trigonometry gives us using the angle parameters we entered. Before finding the x and z distances we need to find the y height because this change will also bring the point closer to the center when looking at x and z from above (which we have to do to find their distances). This is shown below:

sin(vTheta) = y1/radius
cos(vTheta) = newHradius/radius
OR
y1 = radius*sin(vTheta)
newHradius = radius*cos(vTheta)
This gives us the y coordinate of our cameraTarget and the new distance to use for the x and z values (using this distance assures that the target is always at radius distance away from our cameraPosition. If it weren't, many strange things would start happening.)
To find our x and z coordinates we just copy the math from above with the new radius:
x1 = newHradius*cos(hTheta) = radius*cos(vTheta)*cos(hTheta)
z1 = newHradius*sin(hTheta) = radius*cos(vTheta)*sin(hTheta)
That takes care of our second variable. Now all we need is the cameraUpVector.
The Up Vector
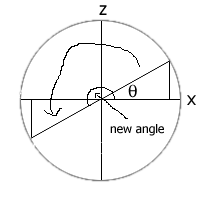
The cameraUpVector is the direction of the line that points straight out the top of your head if it were the Camera. To find this vector we use the same values we have for the target vector and just move it around so it is above us. To accomplish this move and to facilitate for later y angle changes we move the camera to the negative x-z plane angle value as seen below. This changes nothing if the target is on the horizontal plane, but it makes sure that the camera tilts behind us when we look up and not in front of us.

We also tilt the camera back 90 degrees or Pi/2 radians to place the vector on top of our 'head'. The code to get the three coordinates for this looks very much like the target code:
x1 = cameraPosition.X - cameraTarget.X (this way we don't have to do trig again)
z1 = cameraPosition.Z - cameraTarget.Z
y1 = cameraPosition.Y+ radius*sin(vTheta+Pi/2)
Now that we have all of our values we just have to call them from our Render methods in the main code (and we can because we made the variables static) and let Matrix.LookAtLH do the job.
Let's Get Moving
Now that we know the math behind our camera's movements let's make it move. The RotateCamera function simply contains the addition of its parameters to the camera's current angles and the math to find the cameraTarget and cameraUpVector. It is called each time the camera is moved in any way since both of those variables are based on the camera's current position. The SlideCamera function takes the direction of movement as parameters (either 1 or 0 for horizontal and vertical motion) and calculates the new y position just by adding the distance used (stored in moveDist above.) It gets the new x and z values by adding 90 degrees to the current rotation of the camera in that plane (since we are moving to the side not forward and backwards.)
cameraPosition.X += h*moveDist*cos(hTheta+Pi/2); (h is either a 1 or 0 to indicate)
cameraPosition.Z += h*moveDist*sin(hTheta+Pi/2); (movement in this plane or not)
For the MoveCamera function, we use the same math as before but add the distance in each direction using the current angles:
cameraPosition.Y += d*moveDist*sin(vTheta);
cameraPosition.X += d*moveDist*cos(vTheta)*cos(hTheta));
cameraPosition.Z += d*moveDist*cos(vTheta)*sin(hTheta));
d is either positive one or negative one here to indicate forward or backward.
Wrapping Up
Well, now you have all the background you need to make a great camera for your games. If the implementation is not right for you the math will still work just as well, so either way you have left with something useful (at least a better understanding of camera mathematics at any rate.) If you have any questions on the implementation I use, download the source or feel free to email me at mikeschuld@hotmail.com. Good luck.
Michael Schuld
Get source here


