Advertisement

Hexagonal movement

Started by April 03, 2019 08:33 PM
7 comments, last by Rich Brighton 5 years, 5 months ago

Hello,

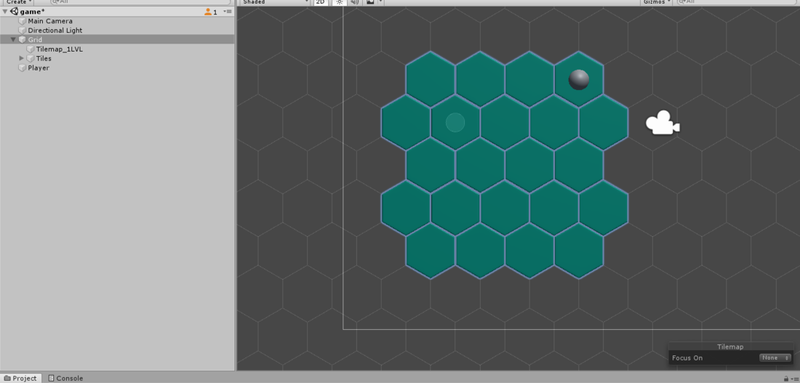
I've never tried creating a game, so I thought it would be interesting and decided to start with a simple 2d game using hexagons as tiles. I'm trying to make hexagonal movement by one tile using mouse click but there is no progress, so I hope to get some help here. I've watched some YouTube tutorials, but I think I need something concrete to make an understanding. I tried to make a bunch of waypoints and then put them in center of each hexagon but then realised it's not going to work with mouseclick.  

I was wondering if it is more simpler to make hexagonal movement by creating tiles as 3D objects because it is possible to click on them or is there any way to make it using hexagonal grid? 


I really hope to get some help with that.


Thank you for your answers.

qdqdqd.PNG

1 hour ago, TheMightyOwl said:

I was wondering if it is more simpler to make hexagonal movement by creating tiles as 3D objects because it is possible to click on them or is there any way to make it using hexagonal grid? 

Since you are a beginner it is easier to start with square tiles.  I recommend you start with the easiest thing that could possibly work, then once you can do that well, add complexity.

For your question about selection, it is possible to select hex grid cells based on clicks through a small amount of math. 

Overall a hex grid works fundamentally the same as a square grid. Navigating in hex tiles is very similar to navigating square tiles with one addition: one direction is unchanged, the other direction has a slight zig-zag.  Selection is similar to a square grid except in the zig/zag area. 

Advertisement

As frob says, hexagons are very similar to plain square grids. To see, imagine a plain square grid, then shift each odd row by 1/2 a square (draw it if you don't see it). There is your hexagon grid, except for the zig-zag pattern between the rows.

If you only click near the center of a tile, this is also how you compute the position of a click. First compute the row of the click. If it is odd, shift the tiles by 1/2 a square and compute the column. For pixel-perfect clicking, you need to compute exactly where the zig-zag pattern is. Best approach for that is to draw a picture with the coordinates and figure out the math you have to do.

I'd suggest you start with a square grid first to detect clicks. A second step is to use the shifted rows. The pixel-perfect clicks will cost you around 2-3 days if you know 2d math, and know how to implement the checks. If you don't know, it's much much longer (this holds for the shifted rows as well).


The trouble with hexagons is that the computations with positions and movement and stuff all get more complicated. It's manageable if you have written a game before, but for your first game, there are so many things you have to figure out and try, it's a waste to spend a month on hexagon tiles so you can click on them. An empty set hexagon tiles is not a game. For this reason, start with the simplest possible solution at first (like a simple square grid) so you can make more progress. If you get stuck (and you will), less and simpler code also means it's simpler and faster to change it to get yourself unstuck. You're building your first car, don't try to make a F1 racing car on your first day!

Hi,

I've found this link very helpful: https://www.redblobgames.com/grids/hexagons/.

Checkout my work here: https://richstrat.com/zug.html code at https://github.com/richtype/openstrat to convert from integer coordinates to regular 2d space you just multiply the y coordinate by the square root of 3. I have doubled up the integer coordinates to allow the hexagon tile sides to have integer coordinates. Most even moderately complex tile games require values for the tile sides as well as the tiles. So the hex side between Hex(10,10) and Hex(12, 12) is HexSide(11, 11).

Under this system even the Hex tile vertices can be given a unique integer coordinate, which can be useful, although that  requires a slightly more complex mapping. In the following yRatio is square root of 3:


def coodToVec2(cood: Cood): Vec2 = coodToVec2(cood.x, cood.y)
   def coodToVec2(x: Int, y: Int): Vec2 =
   {
      def yAdj: Double = y * yRatio
      (x % 4, y % 4) match
      {
         case (xr, yr) if yr.isEven && xr.isEven => Vec2(x, yAdj)
         case (xr, yr) if yr.isEven => throw new Exception("HexCood, y is even but x is odd. This is an invalid HexCood")
         case (xr, yr) if xr.isOdd  && yr.isOdd => Vec2(x, yAdj)      
         case (0, 1) | (2, 3)  =>  Vec2(x, yAdj + yDist /2)
         case (xr, yr) => Vec2(x, yAdj - yDist / 2)
      }
   }


The hexagons at redblobgames are based on axial coordinates. I think the math is difficult.

The integer coordinates that Rich describes is easier to work with. That is because it is the cartesian coordinate system used in Analytical Geometry. And added benefit is that the coordinates can be scaled to the screen coordiates. The drawback from wargamers is that the coordinates do not match their wargame map.

This is easily fixed with a 'Hexagon Name Calculator' method. column = Math.floor(x/4) + row = Math.floor((16-y)/2)

My topic on hexagon names can be found here.

A bonus with Rich's system is movement is straight forward. Move east: x+4, y Move SE: x+2,y-2, etc

And the range is easy:

x = abs(x2-x1) and y = abs(y2-y1)

now if ( y >= x ) range = y/2 else range = (x + y) /4 GREAT!

Mark

Advertisement

Also, the integer coordinates that Rich describes provides a way to identify hexagons and hexsides. Using the coordinate, the terrain can be stored in a database.

Do not get misled that the terrain data is stored in an array simply because there is a x,y

Database design requires one record for each terrain entry (look up data normalization)

Looking at Rich's example, some records would look like:

x, y, terrain
24,8,rough
28,8,lake
34,12,border
etc

More examples of terrain data can be found at terrain examples

Mark

This is the builder method for the North west Europe grid that you can see at: https://richstrat.com/ww2.html


object EuropeWestGrid extends EGridMaker
{
   def apply[TileT <: Tile, SideT <: TileSide](implicit fTile: (Int, Int, Terrain) => TileT, fSide: (Int, Int, SideTerr) => SideT,
       evTile: ClassTag[TileT], evSide: ClassTag[SideT]): EGrid80km[TileT, SideT] =
   {
      val grid: EGFarNorth[TileT, SideT] = new EGFarNorth[TileT, SideT]("WEurope", 0.east, xOffset = 200, xTileMin = 114, xTileMax = 286)
      grid.setTilesAll(Ocean)(fTile)
      grid.setSidesAll(SideNone)(fSide)
      grid.fSetSide(181, 477, Straits)(fSide)
      grid.fSetSide(205, 463, Straits)(fSide)      
      import grid.{setRow => gs}
      gs(518, 230, taiga)
      gs(516, 232, taiga)
      gs(514, 230, taiga) 
      gs(512, 232, taiga)
      gs(510, 230, taiga * 2)
      gs(508, 228, taiga * 3)
      gs(506, 226, taiga * 3)
      gs(504, 224, taiga * 4)
      gs(502, 218, taiga * 6)
      gs(500, 216, taiga * 6) 
      gs(498, 182, taiga, sea * 7, taiga * 7)
      gs(496, 216, taiga * 7)
      gs(494, 198, taiga, sea * 3, taiga * 7)
      gs(492, 216, taiga * 7)
      gs(490, 218, taiga * 3, sea, taiga *3)
      gs(488, 220, taiga * 2, sea * 2, taiga * 3)//, sea * 2)
      gs(486, 186, hills * 2, sea * 10, plain * 3)
      gs(484, 180, hills * 4, sea * 10, plain * 3)
      gs(482, 182, hills * 3, sea * 8, plain * 2, sea, plain * 3)
      gs(480, 184, hills * 2, sea * 9, plain *2, sea, plain * 2)
      gs(478, 182, hills, plain * 3, sea * 7, plain * 2, sea, plain * 2, sea)
      gs(476, 176, plain * 2, sea, hills * 2, sea * 8, plain * 3, sea * 3)
      gs(474, 170, plain * 3, sea * 2, hills, plain, sea * 8, plain * 2, sea * 3)
      gs(472, 168, plain * 3, sea * 3, plain * 2, sea * 7, plain * 6)
      gs(470, 170, plain * 3, sea, hills * 2, plain * 2, sea * 5, plain * 8)
      gs(468, 168, plain * 3, sea, hills * 3, plain * 3, sea * 3, plain * 8)
      gs(466, 170, plain, sea * 3, hills * 2, plain * 3, sea * 2, plain * 4, hills * 2, plain * 4)
      gs(464, 188, plain * 5, sea, plain * 2, hills * 7, plain, hills)
      gs(462, 182, hills * 3, sea * 3, plain * 4, hills * 8)
      gs(460, 204, plain * 3, hills * 10) 
      gs(458, 194, plain * 8, hills * 3, plain, hills * 3, plain)
      gs(456, 188, plain, sea, plain * 7, hills * 3, plain * 3, hills * 2)
      gs(454, 186, plain * 10, hills * 2, plain * 4, hills, mtain)
      gs(452, 192, plain * 9, hills * 2, mtain * 6)
      gs(450, 194, plain * 7, hills, mtain * 8)    
      gs(448, 196, plain * 4, hills * 2, plain, mtain * 9)
      gs(446, 198, plain * 2, hills * 4, mtain * 3, plain * 2, mtain, plain * 2, hills * 2)

      grid
   }
}

I'm rather pleased with the succinctness of the syntax. the setRow method, which works on both square grids and hex grids:


/** Note set Row starts with the y (row) parameter. */ 
  final def setRow[A](yRow: Int, xStart: Int, tileValues: Multiple[A]*)(implicit f: (Int, Int, A) => TileT): Cood =
  {
    val tiles: List[A] = tileValues.toSingles      
    tiles.iForeach{(e, i) =>
      val x = xStart + i * xStep
      fSetTile(x, yRow, e)         
    }
    Cood(xStart + (tiles.length - 1) * xStep, yRow)   
  }

expects a sequence of Multiple[A], but the implicit in the Multiple companion object allows us to pass straight values.


implicit def toMultipleImplicit[A](value: A): Multiple[A] = Multiple(value, 1)


This topic is closed to new replies.

Advertisement